Difference between revisions of "Wireless Internet"
Jump to navigation
Jump to search
| Line 14: | Line 14: | ||
[[Image:Macwireless2.jpg]] | [[Image:Macwireless2.jpg]] | ||
| + | |||
| + | *Click continue when asked for the authentication | ||
| + | |||
| + | [[Image:Macwireless3.jpg]] | ||
| + | |||
| + | *Type in computer username and password to authorize the change | ||
| + | |||
| + | [[Image:Macwireless4.jpg]] | ||
=== Windows XP === | === Windows XP === | ||
Revision as of 13:55, 16 March 2011
Contents
Wirless Internet Setup (Policy)[edit]
- Make sure your computer's operating system is up to date and an AntiVirus software is running (Check Computer Security for instructions on where to get AntiVirus software for free).
Macintosh OSX[edit]
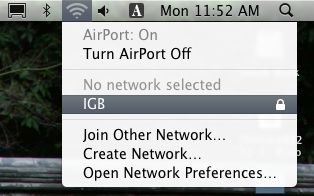
- In OSX click on the wirless icon on the upper right corner of your screen by the clock.
- Select IGB from the list.
- A popup box will appear requesting your authentication information.
- Type in your IGB username and password to connect.
- Click continue when asked for the authentication
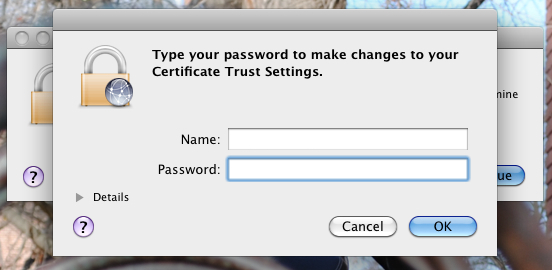
- Type in computer username and password to authorize the change
Windows XP[edit]
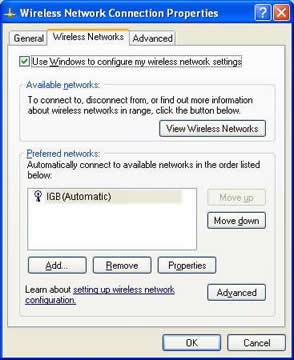
- Click on Start >> Control Panel >> switch to Classic view (if you are in classic view you will not see this option on the upper left side of the window) >> Click on Network Connections >> Double click the wireless network connection >> Click Properties >> Click on the Wireless Networks Tab
- Select IGB and click Properties from the list of wireless networks or click Add.. if IGB does not appear in the list
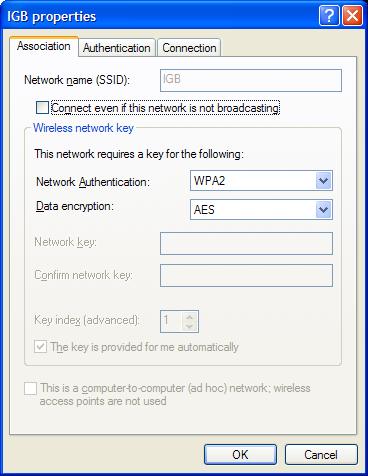
- Set Network name(SSID) to IGB, Network Authentication to WPA2 and Data encryption to AES
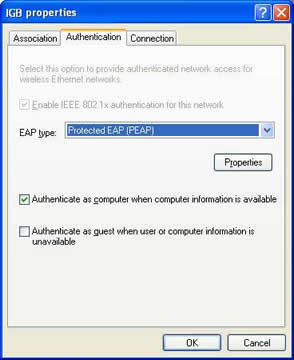
- Click on the Authentication Tab >> Set the EAP type to Protected EAP (PEAP)
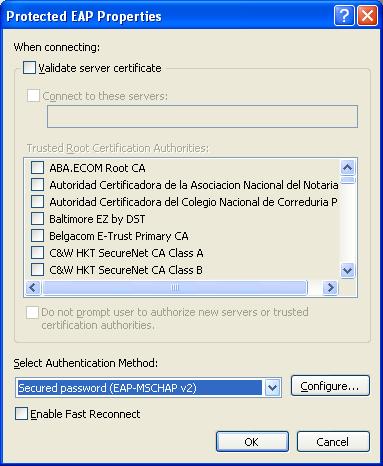
- click on Properties >> Set Select Authentication Method to Secured password (EAP-MSCHAP v2)
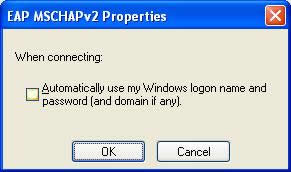
- Click Configure >> Uncheck Automatically use my Windows logon name and password (and domain if any)
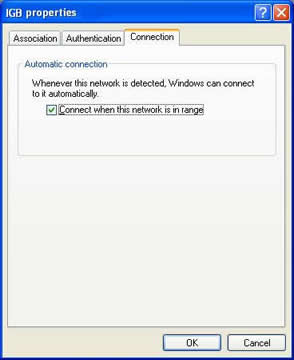
- click Ok twice to go back to the IGB properties windows. Now select the Connection tab and check Connect when this network is in range
- Click OK on all windows to close them.
- A few seconds later a small yellow balloon will apear on the lower right part of the desktop, click it to open the authentication window, input in your IGB username,password and leave the Domain blank.
Windows 7[edit]
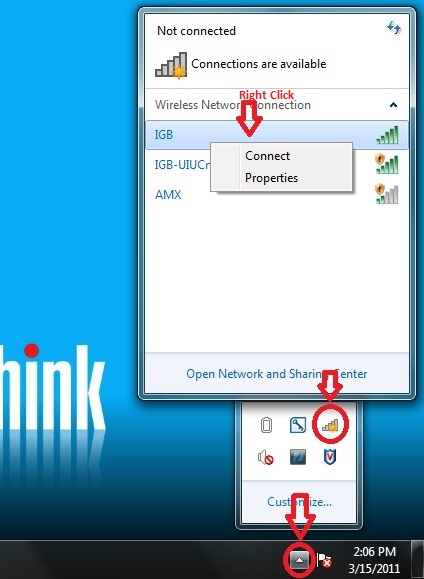
- Windows 7 should automatically detect the settings. If it does not, below are screenshots to setup the IGB wireless network
- Click the wireless icon on the lower right part of the desktop (you may have to hit to view available wireless networks, then right click the IGB network and select Properties
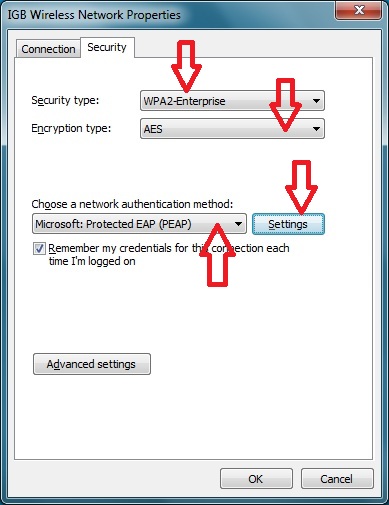
- On the IGB Wireless Network Properties window select:
- Security type: WPA2-Enterprise
- Encryption type: AES
- Choose a network authentication method: Microsoft: Protected EAP (PEAP)
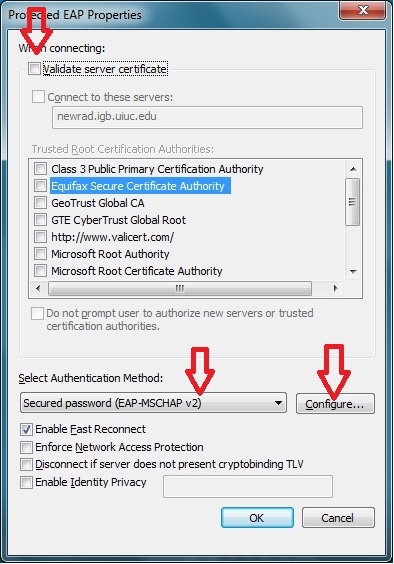
- Click on the Settings button. On the new window Protected EAP Properties set the following:
- Uncheck Validate server certificate.
- Select Authentication Method: Secured password (EAP-MSCHAP v2)
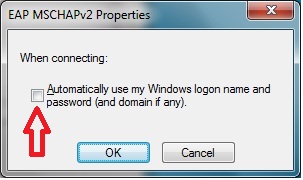
- Click on Configure and Uncheck Automatically use my Windows logon name and password (and domain if any).
- click OK on all open windows
- A few seconds later a small yellow balloon will apear on the lower right part of the desktop, click it to open the authentication window, input in your IGB username,password and leave the Domain blank.
- If a small window comes up after you authenticate mentioning a certificate hit Ok on it.
Windows Vista[edit]
- Click on the Start icon and select Control Panel
- Choose Network and Sharing Center
- Select Manage Wireless Networks from the list on the left
- Click Add
- Choose to Manually Create a Network Profile
- Add the Network name: IGB
- Choose the Security type: WPA2-Enterprise
- Choose the Encryption type: AES
- Make sure both boxes are ticked:
- Start this connection automatically
- Connect even if the network is not broadcasting
- Click Next
- It will tell you that it has Successfully added IGB.
- Now you need to click on Change connection settings
- Select the Security tab and click on Settings
- Untick Validate Server Certificate
- Tick Enable Fast Reconnect
- Select Authentication method: Secured password (EAP-MSCHAP v2)
- Click on Configure
- Untick Automatically use my windows password ...
- Click OK until you return to the Manually connect to a wireless network window
- Click on Connect to ...
- Select IGB as the network to connect to and click Connect:
- Click on the bubble Additional information is required to connect to IGB
- Type your IGB username
- Type your password
- Leave the Logon Domain field blank
- Click OK and you should be connected to the IGB network
Ubuntu/Linux[edit]
- The following steps works successfully on Ubuntu 10.10. They should be similar on different version of Ubuntu, Fedora, or other Linux versions.
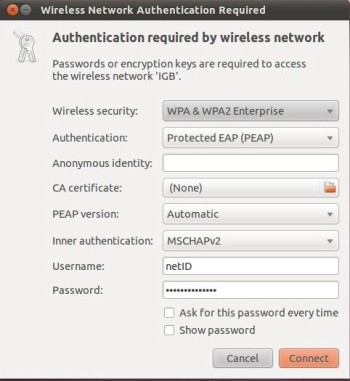
- When you attempt to connect to the IGB network, the box below should appear.
- Change Authentication to "Protected EAP (PEAP)"
- Type your netID in the Username field.
- Type your IGB password in the password field.
- Click "Connect".
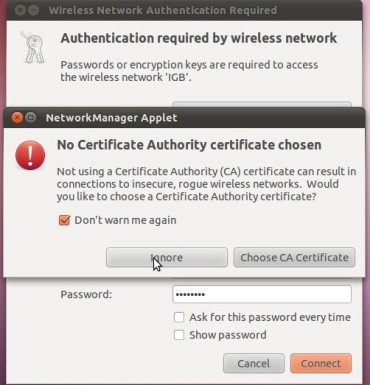
- The following box will then appear
- Check "Don't warn me again".
- Click on "Ignore".
