CrashPlan Installation: Difference between revisions
Jump to navigation
Jump to search
No edit summary |
|||
| Line 1: | Line 1: | ||
= CrashPlan Installation Guide = | = CrashPlan Installation Guide = | ||
== Mac OSX == | |||
*Click on the download link in the email you received | *Click on the download link in the email you received | ||
[[Image:CP_OSX_1.png]] | [[Image:CP_OSX_1.png]] | ||
| Line 24: | Line 24: | ||
[[Image:CP_OSX_15.png]] | [[Image:CP_OSX_15.png]] | ||
== Windows == | |||
*Click on the download link in the email you received | *Click on the download link in the email you received | ||
[[Image:CP_Windows_1.png]] | [[Image:CP_Windows_1.png]] | ||
| Line 42: | Line 42: | ||
[[Image:CP_Windows_8.png]] | [[Image:CP_Windows_8.png]] | ||
== Linux == | |||
*Click on the download link in the email you received | *Click on the download link in the email you received | ||
[[Image:CP_Linux_01.png]] | [[Image:CP_Linux_01.png]] | ||
Revision as of 08:10, 22 January 2014
CrashPlan Installation Guide
Mac OSX
- Click on the download link in the email you received
- Click "Complete Registration", all information is already filled in
- Select your operating system
- Save the file to your computer
- Click on the downloaded file to launch the installer
- Double click on the mounted folder
- Select Install CrashPlan PROe
- Continue and Agree through the setup process (enter computer password when prompted)
- A new window will appear, select "Existing Account"
- Type in your NetID, Password, then copy and paste the server address from the email and click sign in
- Computer will begin backing up files in your User directory
Windows
- Click on the download link in the email you received
- Click "Complete Registration", all information is already filled in
- Select your operating system
- Save the file to your computer & Double Click to Launch
- Continue and Agree through the setup process
- A new window will appear, select "Existing Account"
- Type in your NetID, Password, then copy and paste the server address from the email and click sign in
- Computer will begin backing up files in your User directory
Linux
- Click on the download link in the email you received
- Click Save File on the dialog box that appears
- Double-Click on the download to open the .tgz file
- Extract the files to a folder of your choice on your computer
- In terminal navigate to the folder containing the extracted files
- Run the install.sh file by typing: ./install.sh
- Agree and read through the EULA
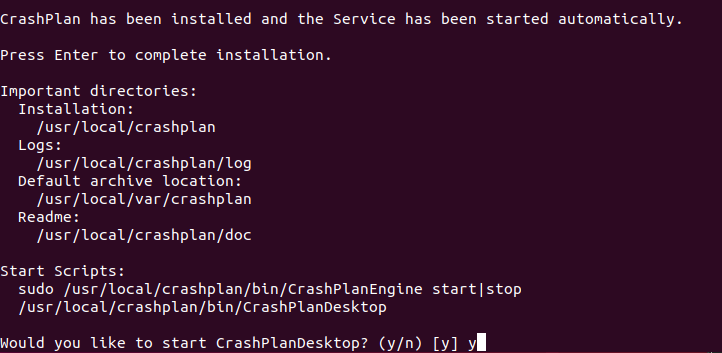
- Say yes/use recommendations throughout entire setup, a summary of choices will be displayed at the end
- Answer "y" when asked if you want to start CrasPlanDesktop
- A new window will appear, select "Existing Account"
- Type in your NetID, Password, then copy and paste the server address from the email and click sign in
- Computer will begin backing up your user directory


