Difference between revisions of "Remote Desktop"
Jump to navigation
Jump to search
(→Remote Connection) |
m (→Remote Connection Settings on your at-work computer) |
||
| (4 intermediate revisions by 2 users not shown) | |||
| Line 1: | Line 1: | ||
__TOC__ | __TOC__ | ||
| − | == | + | == Setup == |
| − | + | === Finding the IP Address on your at-work computer === | |
| − | |||
| − | = | ||
| − | |||
| − | |||
| − | |||
| − | |||
| − | |||
| − | |||
| − | |||
| − | |||
| − | |||
| − | |||
| − | |||
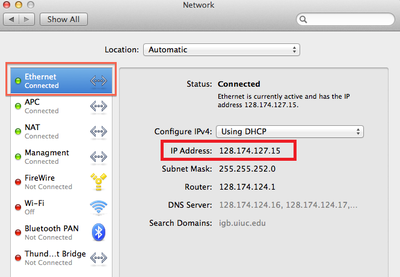
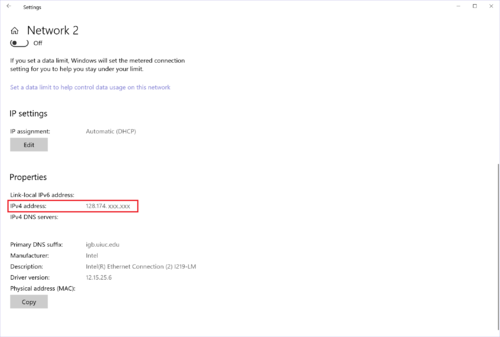
*You will need the IP address of the computer you are trying to remotely access. | *You will need the IP address of the computer you are trying to remotely access. | ||
<div class="toccolours mw-collapsible mw-collapsed" style="width:900px"> | <div class="toccolours mw-collapsible mw-collapsed" style="width:900px"> | ||
| − | === | + | ==== macOS ==== |
<div class="mw-collapsible-content"> | <div class="mw-collapsible-content"> | ||
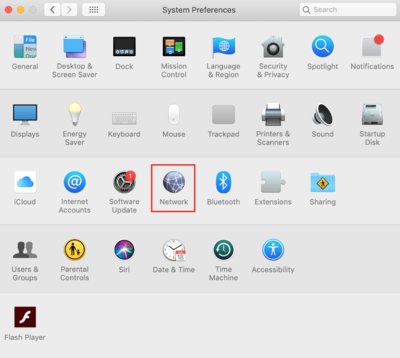
*Open System Preferences and click on "Network" | *Open System Preferences and click on "Network" | ||
| Line 27: | Line 14: | ||
<div class="toccolours mw-collapsible mw-collapsed" style="width:900px"> | <div class="toccolours mw-collapsible mw-collapsed" style="width:900px"> | ||
| − | === Windows 10 === | + | ==== Windows 10 ==== |
<div class="mw-collapsible-content"> | <div class="mw-collapsible-content"> | ||
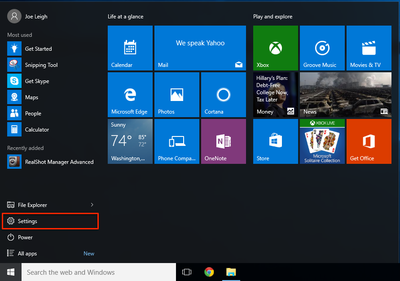
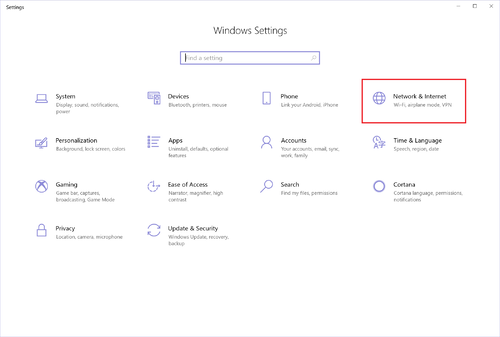
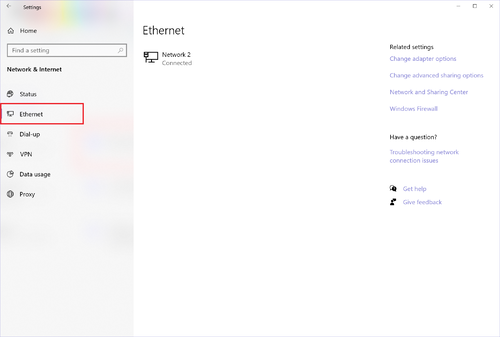
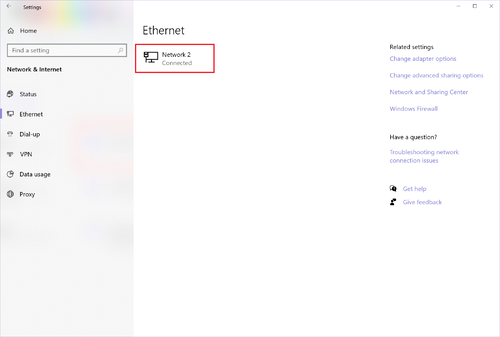
*Open the Settings window by going to: Start -> Settings | *Open the Settings window by going to: Start -> Settings | ||
| Line 41: | Line 28: | ||
</div></div> | </div></div> | ||
| − | == Setting a Password on Computer == | + | === Setting a Password on your at-work Computer === |
*The computer you are trying to remotely access MUST have a password set otherwise Remote Access will not work. | *The computer you are trying to remotely access MUST have a password set otherwise Remote Access will not work. | ||
*If you already have a password set, you can skip this step. | *If you already have a password set, you can skip this step. | ||
<div class="toccolours mw-collapsible mw-collapsed" style="width:900px"> | <div class="toccolours mw-collapsible mw-collapsed" style="width:900px"> | ||
| − | === | + | ==== macOS ==== |
<div class="mw-collapsible-content"> | <div class="mw-collapsible-content"> | ||
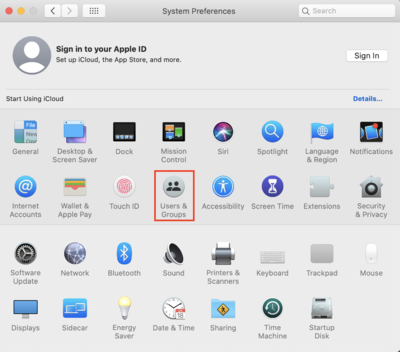
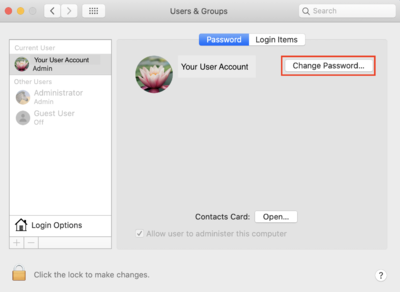
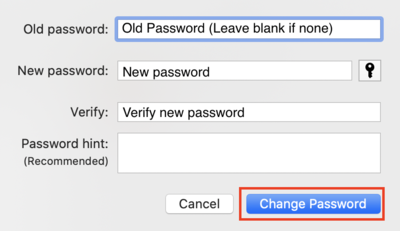
*Open System Preferences and click on "Users & Groups" | *Open System Preferences and click on "Users & Groups" | ||
| Line 57: | Line 44: | ||
<div class="toccolours mw-collapsible mw-collapsed" style="width:900px"> | <div class="toccolours mw-collapsible mw-collapsed" style="width:900px"> | ||
| − | === Windows 10 === | + | ==== Windows 10 ==== |
<div class="mw-collapsible-content"> | <div class="mw-collapsible-content"> | ||
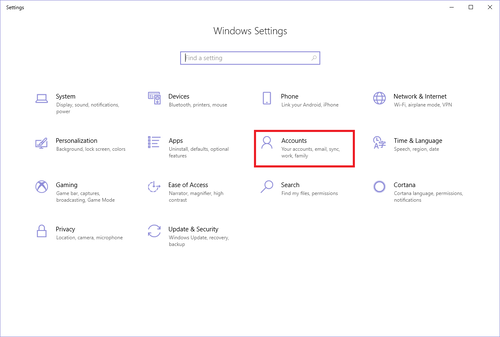
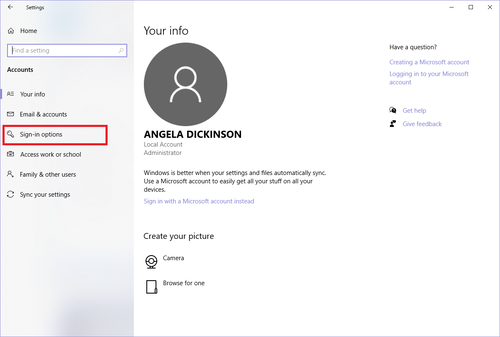
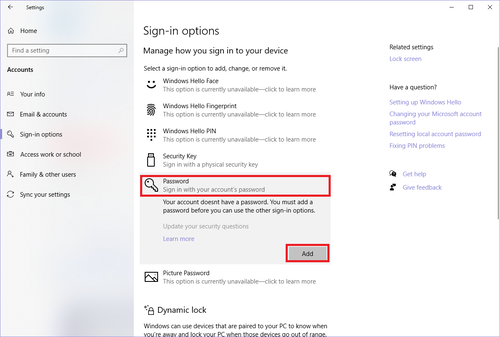
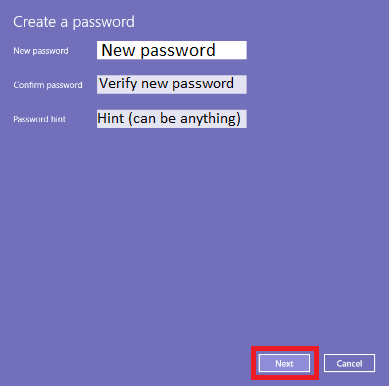
*Open the Settings window by going to: Start -> Settings | *Open the Settings window by going to: Start -> Settings | ||
| Line 72: | Line 59: | ||
</div></div> | </div></div> | ||
| − | == Remote Connection Settings == | + | === Remote Connection Settings on your at-work computer === |
| − | *You will to correctly set the following settings on the computer you are trying to remotely access to allow it. | + | *You will have to correctly set the following settings on the computer you are trying to remotely access to allow it. |
<div class="toccolours mw-collapsible mw-collapsed" style="width:900px"> | <div class="toccolours mw-collapsible mw-collapsed" style="width:900px"> | ||
| − | === | + | ==== macOS ==== |
<div class="mw-collapsible-content"> | <div class="mw-collapsible-content"> | ||
| − | ==== Enable Screen Sharing ==== | + | ===== Enable Screen Sharing ===== |
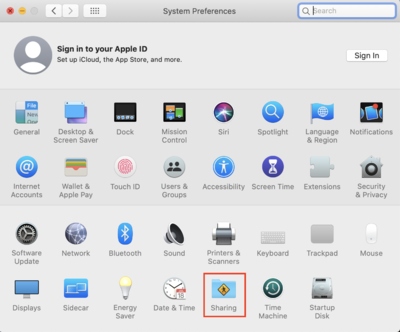
*Open System Preferences and click on "Sharing" | *Open System Preferences and click on "Sharing" | ||
*;[[File:macsetting.png|400px]] | *;[[File:macsetting.png|400px]] | ||
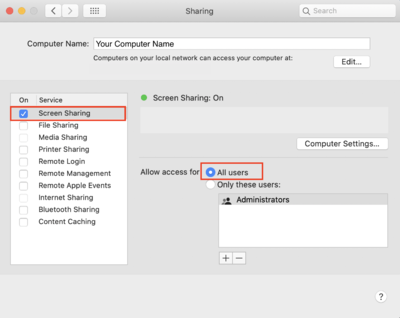
| − | *Check the box for "Screen Sharing" to turn it on. | + | *Check the box for "Screen Sharing" to turn it on. Also make sure that it is set to Allow access for: All users. |
| − | *;[[File: | + | *;[[File:macsettingnew.png|400px]] |
</div></div> | </div></div> | ||
<div class="toccolours mw-collapsible mw-collapsed" style="width:900px"> | <div class="toccolours mw-collapsible mw-collapsed" style="width:900px"> | ||
| − | === Windows 10 === | + | |
| + | ==== Windows 10 ==== | ||
<div class="mw-collapsible-content"> | <div class="mw-collapsible-content"> | ||
| − | ==== Enable Remote Access ==== | + | ===== Enable Remote Access ===== |
*Open the Settings window by going to: Start -> Settings | *Open the Settings window by going to: Start -> Settings | ||
*;[[File:Win10PrinterSetup1.png|400px]] | *;[[File:Win10PrinterSetup1.png|400px]] | ||
| Line 96: | Line 84: | ||
*A window will pop up asking if you want to Enable Remote Desktop? Click "Confirm" | *A window will pop up asking if you want to Enable Remote Desktop? Click "Confirm" | ||
*;[[File:Winsetting3.png|500px]] | *;[[File:Winsetting3.png|500px]] | ||
| − | ==== Change Sleep Settings ==== | + | ===== Change Sleep Settings ===== |
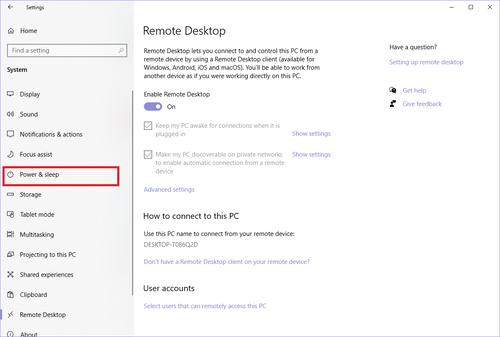
*Next, you have to change your sleep settings so that your computer stays awake to access. Click on "Power & sleep" at the left-hand side of the window. | *Next, you have to change your sleep settings so that your computer stays awake to access. Click on "Power & sleep" at the left-hand side of the window. | ||
*;[[File:Winsetting4.png|500px]] | *;[[File:Winsetting4.png|500px]] | ||
| Line 103: | Line 91: | ||
</div></div> | </div></div> | ||
| − | == Remote | + | === Installing and Using Cisco VPN on your at-home computer === |
| − | *Once | + | *Your remote computer MUST be connected to the VPN in order to use Remote Desktop |
| + | <div class="toccolours mw-collapsible mw-collapsed" style="width:900px"> | ||
| + | ==== macOS ==== | ||
| + | <div class="mw-collapsible-content"> | ||
| + | *Follow Tech Services' guide for installing and using Cisco VPN, located at this link: https://answers.uillinois.edu/illinois/page.php?id=47629 | ||
| + | </div></div> | ||
| + | |||
| + | <div class="toccolours mw-collapsible mw-collapsed" style="width:900px"> | ||
| + | ==== Windows 10 ==== | ||
| + | <div class="mw-collapsible-content"> | ||
| + | *Follow Tech Services' guide for installing and using Cisco VPN, located at this link: https://answers.uillinois.edu/illinois/page.php?id=47507 | ||
| + | </div></div> | ||
| + | |||
| + | |||
| + | == How to use == | ||
| + | *Once the above setup is complete, follow these directions to connect remotely to your at-work computer. | ||
<div class="toccolours mw-collapsible mw-collapsed" style="width:900px"> | <div class="toccolours mw-collapsible mw-collapsed" style="width:900px"> | ||
| − | === | + | === FROM macOS at home TO Windows at work === |
<div class="mw-collapsible-content"> | <div class="mw-collapsible-content"> | ||
*Download Microsoft Remote Desktop 10 from the App Store, located at this link: https://apps.apple.com/us/app/microsoft-remote-desktop-10/id1295203466?mt=12 | *Download Microsoft Remote Desktop 10 from the App Store, located at this link: https://apps.apple.com/us/app/microsoft-remote-desktop-10/id1295203466?mt=12 | ||
| Line 125: | Line 128: | ||
<div class="toccolours mw-collapsible mw-collapsed" style="width:900px"> | <div class="toccolours mw-collapsible mw-collapsed" style="width:900px"> | ||
| − | === Windows | + | === FROM Windows at home TO Windows at work === |
<div class="mw-collapsible-content"> | <div class="mw-collapsible-content"> | ||
*Open the Windows Menu, scroll down and click on "Windows Accessories", and then click on "Remote Desktop Connection" | *Open the Windows Menu, scroll down and click on "Windows Accessories", and then click on "Remote Desktop Connection" | ||
| Line 138: | Line 141: | ||
</div></div> | </div></div> | ||
<div class="toccolours mw-collapsible mw-collapsed" style="width:900px"> | <div class="toccolours mw-collapsible mw-collapsed" style="width:900px"> | ||
| − | === | + | |
| + | === FROM macOS at home TO macOS at work === | ||
<div class="mw-collapsible-content"> | <div class="mw-collapsible-content"> | ||
*Download VNC Viewer at this link: https://www.realvnc.com/en/connect/download/viewer/ | *Download VNC Viewer at this link: https://www.realvnc.com/en/connect/download/viewer/ | ||
| Line 160: | Line 164: | ||
</div></div> | </div></div> | ||
<div class="toccolours mw-collapsible mw-collapsed" style="width:900px"> | <div class="toccolours mw-collapsible mw-collapsed" style="width:900px"> | ||
| − | === Windows | + | |
| + | === FROM Windows at home TO macOS at work === | ||
<div class="mw-collapsible-content"> | <div class="mw-collapsible-content"> | ||
*Download VNC Viewer at this link: https://www.realvnc.com/en/connect/download/viewer/ | *Download VNC Viewer at this link: https://www.realvnc.com/en/connect/download/viewer/ | ||
Latest revision as of 14:29, 23 March 2020
Contents
Setup[edit]
Finding the IP Address on your at-work computer[edit]
- You will need the IP address of the computer you are trying to remotely access.
macOS[edit]
Windows 10[edit]
Setting a Password on your at-work Computer[edit]
- The computer you are trying to remotely access MUST have a password set otherwise Remote Access will not work.
- If you already have a password set, you can skip this step.
macOS[edit]
Windows 10[edit]
Remote Connection Settings on your at-work computer[edit]
- You will have to correctly set the following settings on the computer you are trying to remotely access to allow it.
Windows 10[edit]
Enable Remote Access[edit]
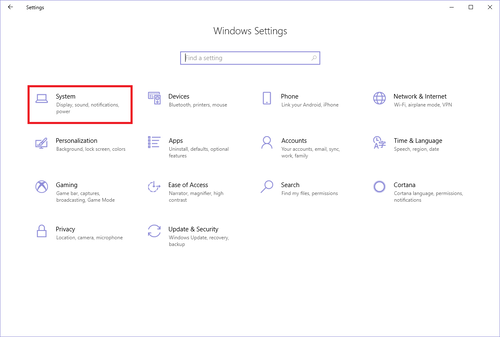
- Open the Settings window by going to: Start -> Settings
- Click "System"
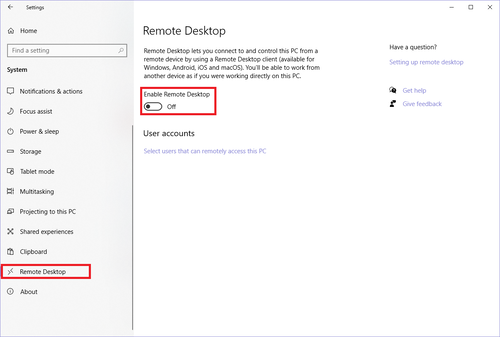
- Click "Remote Desktop" in the left-hand side and then Click the slider to turn the option for "Enable Remote Desktop" from "Off" to "On".
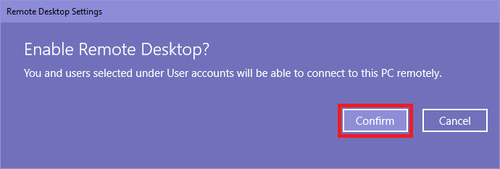
- A window will pop up asking if you want to Enable Remote Desktop? Click "Confirm"
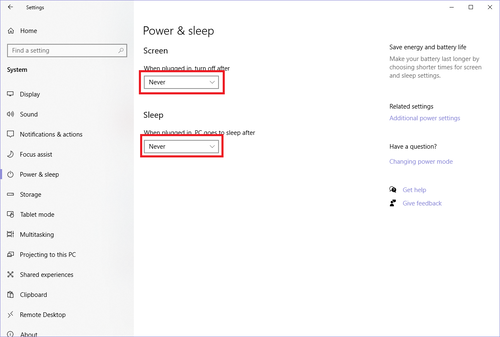
Change Sleep Settings[edit]
Installing and Using Cisco VPN on your at-home computer[edit]
- Your remote computer MUST be connected to the VPN in order to use Remote Desktop
macOS[edit]
- Follow Tech Services' guide for installing and using Cisco VPN, located at this link: https://answers.uillinois.edu/illinois/page.php?id=47629
Windows 10[edit]
- Follow Tech Services' guide for installing and using Cisco VPN, located at this link: https://answers.uillinois.edu/illinois/page.php?id=47507
How to use[edit]
- Once the above setup is complete, follow these directions to connect remotely to your at-work computer.
FROM macOS at home TO Windows at work[edit]
- Download Microsoft Remote Desktop 10 from the App Store, located at this link: https://apps.apple.com/us/app/microsoft-remote-desktop-10/id1295203466?mt=12
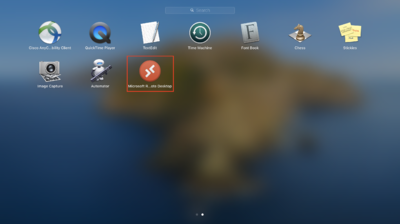
- Go to your Applications and open "Microsoft Remote Desktop 10"
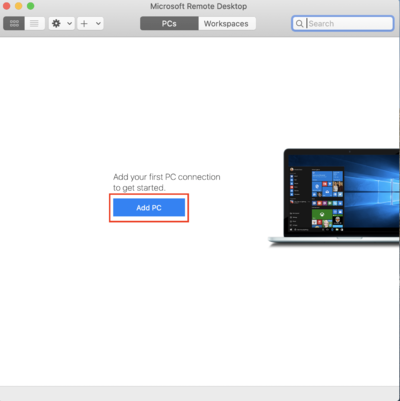
- Click on "Add PC"
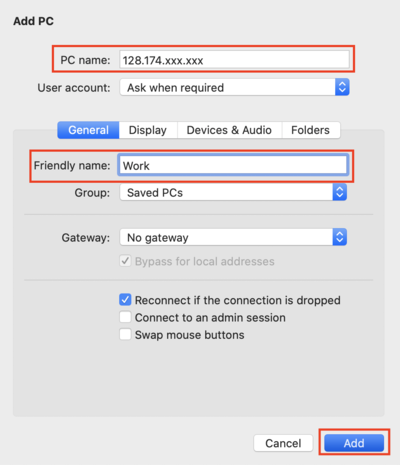
- Enter the IP address you collected from the computer you would like to remotely access for "PC Name". Choose a nickname for the connection next to "Friendly name". Click "Add".
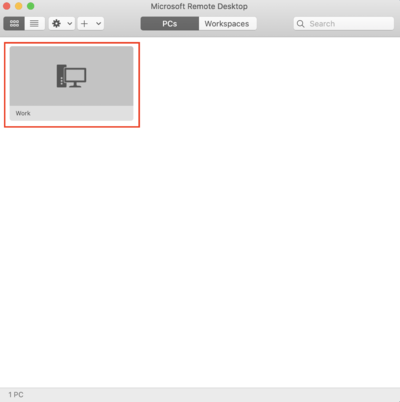
- Double-click the computer connection that now shows under PCs.
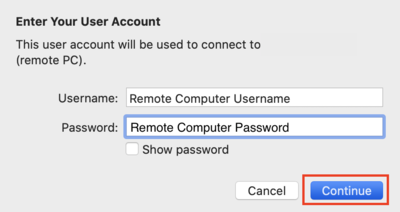
- Enter the username and password for the computer you are trying to connect to. Click "Continue".
- In the window that pops up, click "Continue" to connect.
- The desktop of the computer you are remotely accessing should appear and you can do work on it normally.
FROM Windows at home TO Windows at work[edit]
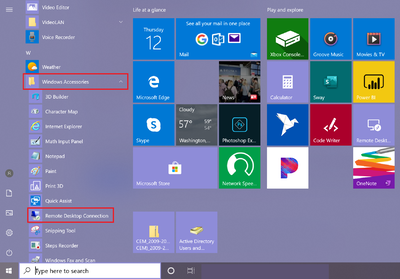
- Open the Windows Menu, scroll down and click on "Windows Accessories", and then click on "Remote Desktop Connection"
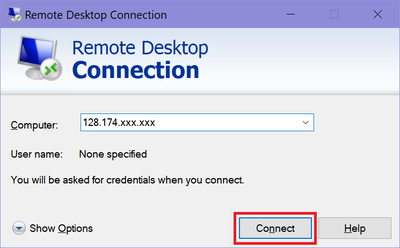
- In the window that opens, enter the IP address you found earlier into the box for "Computer". Click "Connect".
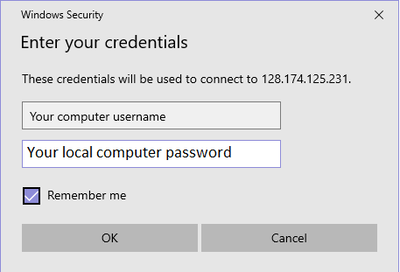
- Another window will pop up asking for your credentials. These credentials are the username and password for the computer you are trying to connect to.
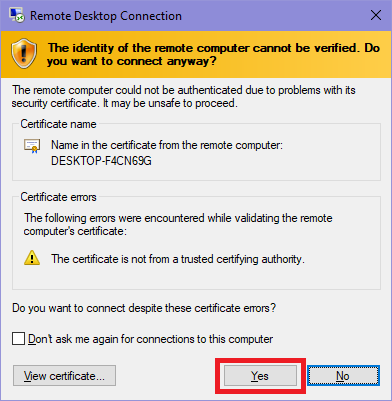
- When the window below pops up, click "Yes" to connect.
- The desktop of the computer you are connecting to will pop up, and you can access it as though you are sitting in front of that computer.
FROM macOS at home TO macOS at work[edit]
- Download VNC Viewer at this link: https://www.realvnc.com/en/connect/download/viewer/
- Go to where you downloaded it to and double click the .dmg file.
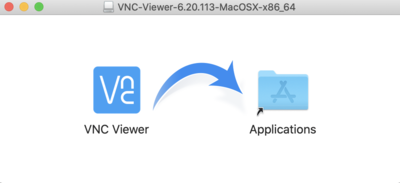
- Drag the "VNC Viewer" Logo to the "Applications" folder in the box that pops up to add it to your applications.
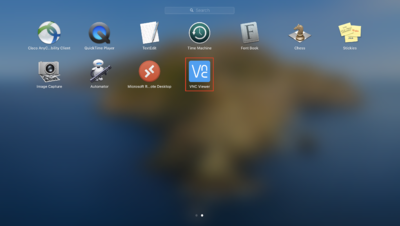
- Go to your applications and click on VNC Viewer to open it.
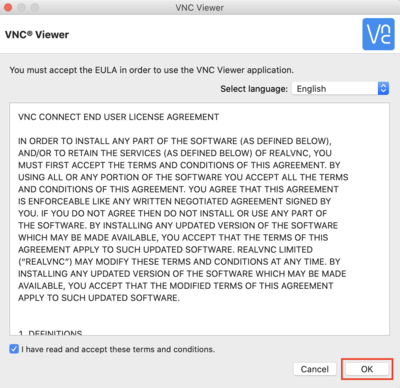
- Check the box to accept the Terms and Conditions, then click "OK"
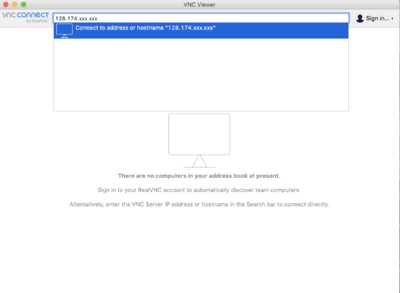
- Enter the IP address for the computer you are trying to access remotely in the box that says "Enter a VNC Server address or search" and then click the enter key.
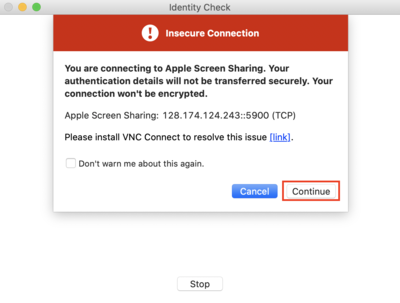
- Click "Continue" on the next screen that pops up
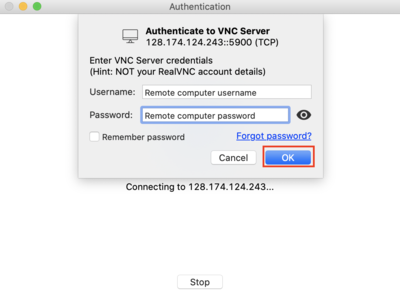
- An authentication window will pop up. Enter the following information:
- Username: Your username on the computer you are trying to remotely access
- Password: Your password on the computer you are trying to remotely access
- Click "OK"
- The remote computers desktop should now be showing so you can work on it.
FROM Windows at home TO macOS at work[edit]
- Download VNC Viewer at this link: https://www.realvnc.com/en/connect/download/viewer/
- Go to where you downloaded it to and double click the .exe file.
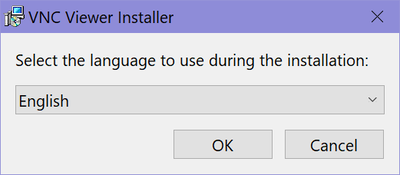
- Select the language you want and click “OK”.
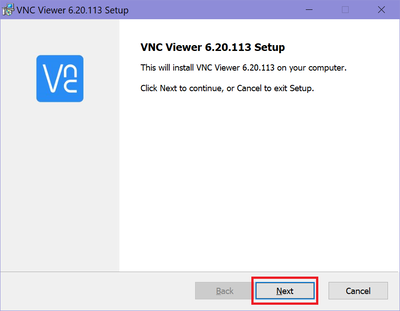
- When the installer opens, click “Next” to continue with installation.
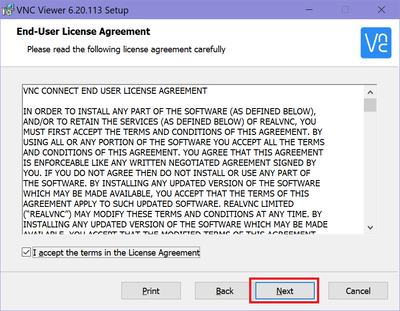
- Check the box to accept the License Agreement, then click "Next"
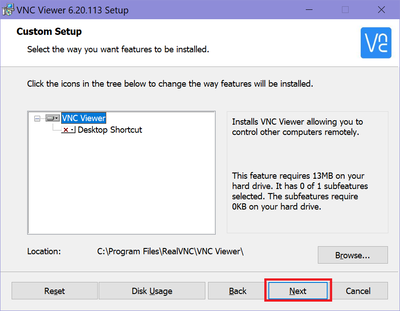
- In the next window, don’t change anything, just click “Next”
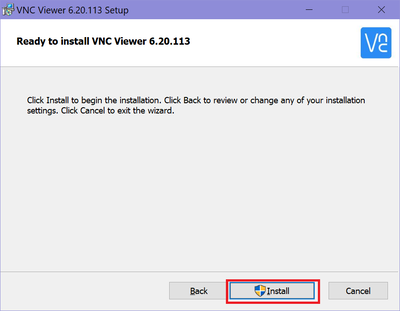
- Click “Install” to install the program. When it completes, click “Finish” to finish the installation
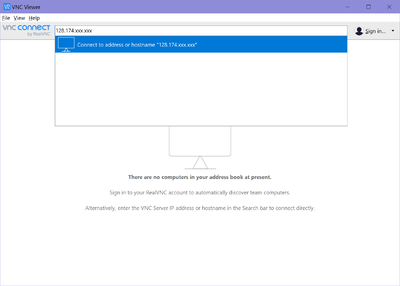
- Enter the IP address for the computer you are trying to access remotely in the box that says "Enter a VNC Server address or search" and then click the enter key.
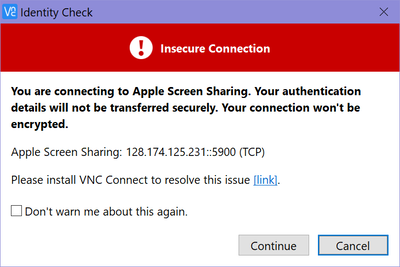
- Click "Continue" on the next screen that pops up
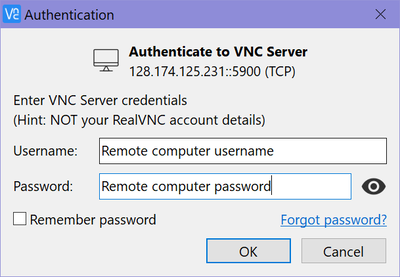
- An authentication window will pop up. Enter the following information:
- Username: Your username on the computer you are trying to remotely access
- Password: Your password on the computer you are trying to remotely access
- Click "OK"
- The remote computers desktop should now be showing so you can work on it.
