Classroom Information: Difference between revisions
Jump to navigation
Jump to search
No edit summary |
No edit summary |
||
| Line 1: | Line 1: | ||
__TOC__ | __TOC__ | ||
== User Information: == | == User Information: == | ||
| Line 12: | Line 14: | ||
One way in Windows 7 would be as follows. This will work in the classroom and on campus. For off campus access, please see the Winscp directions below. | One way in Windows 7 would be as follows. This will work in the classroom and on campus. For off campus access, please see the Winscp directions below. | ||
#Click the Start Button at the bottom left of the screen | |||
#In the search field type file-server.igb.illinois.edu. | |||
#:[[File:Classfile1.jpg]] | |||
#You will double click on the classroom folder and you should see in the address bar as shown below. | |||
[[File:Classfile1.jpg]] | #:[[File:Classfile2.jpg]] | ||
[[File:Classfile2.jpg]] | |||
Another option to access the file-server from the classroom is to use winscp. | Another option to access the file-server from the classroom is to use winscp. | ||
#Open Winscp | |||
#In the Host Name field you will enter file-server.igb.illinois.edu as you see below, then you will enter the username and password that was given to you in class. | |||
#Click on the Login button | |||
#:[[File:Classfile3.jpg]] | |||
#You will need to click the Open Directory/Bookmark button. | |||
#Enter the information in the Open Directory field as you see it below. | |||
[[File:Classfile3.jpg]] | #Click ok. | ||
#:[[File:Classfile4.jpg]] | |||
[[File:Classfile4.jpg]] | |||
== Biocluster: == | == Biocluster: == | ||
| Line 48: | Line 39: | ||
Again from Windows 7 you will use winscp. | Again from Windows 7 you will use winscp. | ||
#Open Winscp | |||
#Enter the Host name biocluster.igb.illinois.edu. Make sure to use the username and password that was given to you in class. | |||
#Click the Login Button. | |||
#:[[File:Classcluster1.jpg]] | |||
#Click on the Open Directory/Bookmark button. | |||
#Fill in the open directory field like you see in the picture below. | |||
[[File:Classcluster1.jpg]] | #Click ok. | ||
#:[[File:Classcluster2.jpg]] | |||
[[File:Classcluster2.jpg]] | |||
Also for classroom use, make sure to use -q classroom when submitting a job. | Also for classroom use, make sure to use -q classroom when submitting a job. | ||
Revision as of 14:08, 27 August 2014
User Information:
Your username will be giving to you in class. This will not be your netID.
File Server:
If you are using the file-server to store files. Access to the file server can be accomplished following the directions on this link.
http://help.igb.illinois.edu/File_Server_Access
One way in Windows 7 would be as follows. This will work in the classroom and on campus. For off campus access, please see the Winscp directions below.
- Click the Start Button at the bottom left of the screen
- In the search field type file-server.igb.illinois.edu.
- You will double click on the classroom folder and you should see in the address bar as shown below.
Another option to access the file-server from the classroom is to use winscp.
- Open Winscp
- In the Host Name field you will enter file-server.igb.illinois.edu as you see below, then you will enter the username and password that was given to you in class.
- Click on the Login button
- You will need to click the Open Directory/Bookmark button.
- Enter the information in the Open Directory field as you see it below.
- Click ok.
Biocluster:
Infomation on how to use the biocluster and to access files stored there are located here
Again from Windows 7 you will use winscp.
- Open Winscp
- Enter the Host name biocluster.igb.illinois.edu. Make sure to use the username and password that was given to you in class.
- Click the Login Button.
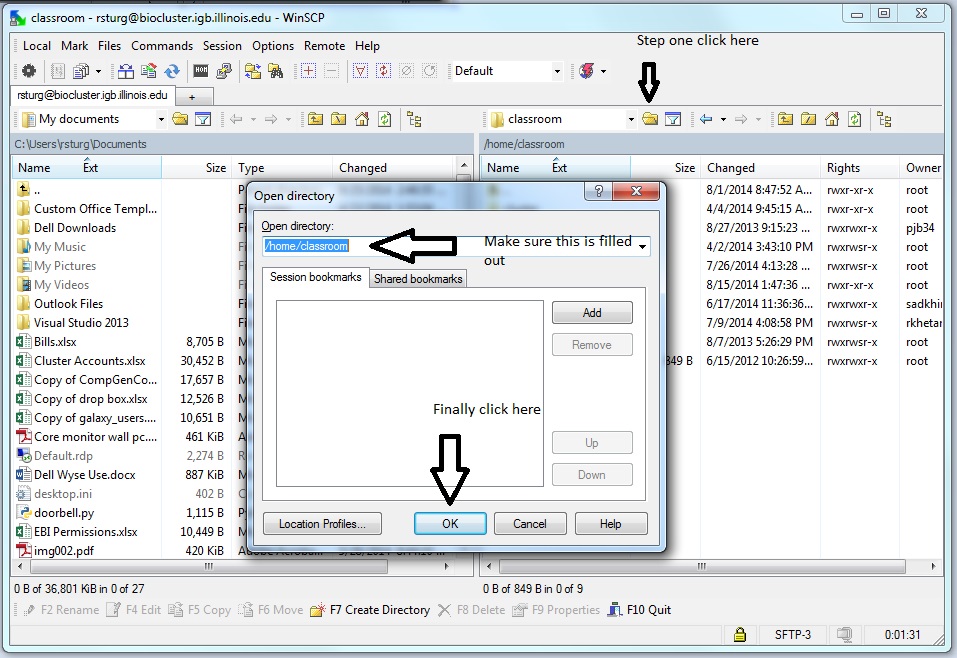
- Click on the Open Directory/Bookmark button.
- Fill in the open directory field like you see in the picture below.
- Click ok.
Also for classroom use, make sure to use -q classroom when submitting a job.
