Hardware Address: Difference between revisions
Jump to navigation
Jump to search
No edit summary |
No edit summary |
||
| Line 1: | Line 1: | ||
== How to Find Hardware Address | == How to Find Hardware Address == | ||
*'''make sure your Ethernet cable is plugged in while completing these steps''' | *'''make sure your Ethernet cable is plugged in while completing these steps''' | ||
*Hardware address can also be referred to as Mac Address or Physical Address | *Hardware address can also be referred to as Mac Address or Physical Address | ||
*Use the steps from the appropriate section below to find your computer's Mac Address, | *Use the steps from the appropriate section below to find your computer's Mac Address, | ||
*Once you have found it, enter into the field in the form. Please leave out hyphens and colons. | *Once you have found it, enter into the field in the form. Please leave out hyphens and colons. | ||
=== Windows 7 | === Windows 7 === | ||
<div class="toccolours mw-collapsible" style="width:600px"> | |||
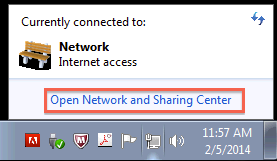
*At the bottom right corner of the screen click on Network > Open Network and Sharing Center | |||
[[File:Windows7 1.png]] | |||
[[ | |||
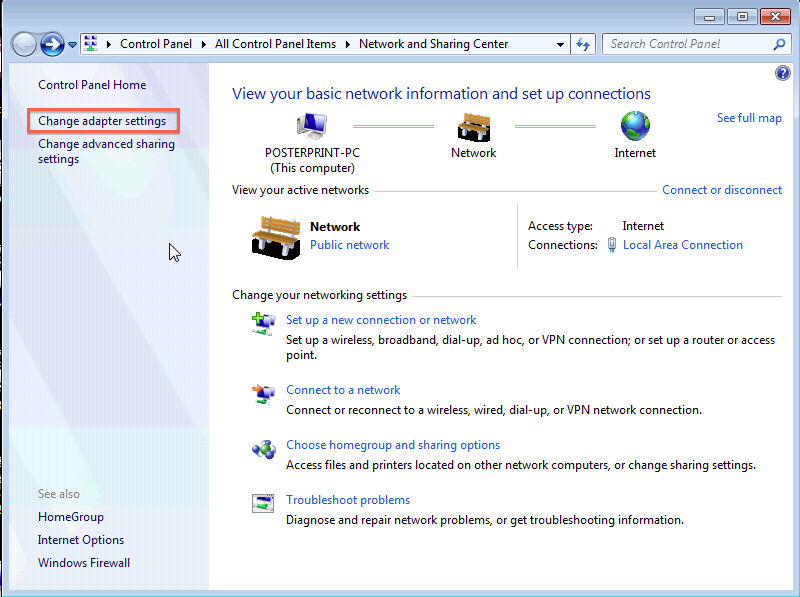
*Click on "Change Adapter Settings" | *Click on "Change Adapter Settings" | ||
[[ | [[File:Windows7 2.png]] | ||
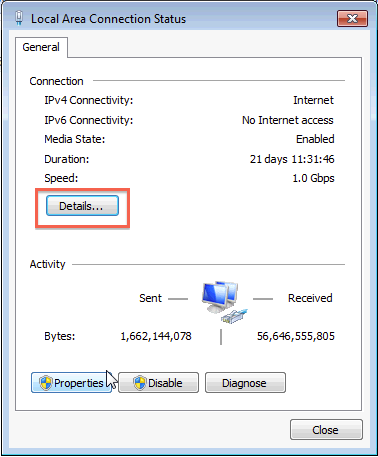
*Select "Local Area Connection" | *Select "Local Area Connection" | ||
[[ | [[File:Windows7 3.png]] | ||
*Click on "Details" | *Click on "Details" | ||
[[ | [[File:Windows7 4.png]] | ||
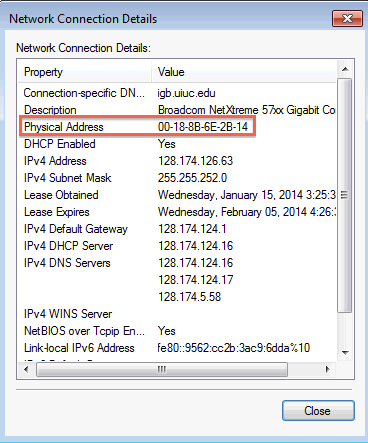
*The MAC Address is the "Physical Address" listed in the table | *The MAC Address is the "Physical Address" listed in the table | ||
[[ | [[File:Windows7 5.png]] | ||
</div> | |||
=== Windows 8 | === Windows 8 === | ||
*On the tile screen, select the desktop tile | *On the tile screen, select the desktop tile | ||
[[ | [[File:Windows8 1.png]] | ||
*In the lower right corner, right click on the network icon and choose "Open Network and Sharing Center" | *In the lower right corner, right click on the network icon and choose "Open Network and Sharing Center" | ||
[[ | [[File:Windows8 2.png]] | ||
*In the left column, choose "Change Adapter Settings" | *In the left column, choose "Change Adapter Settings" | ||
[[ | [[File:Windows8 3.png]] | ||
*Select the Ethernet Connection | *Select the Ethernet Connection | ||
[[ | [[File:Windows8 4.png]] | ||
*Click on "Details" | *Click on "Details" | ||
[[ | [[File:Windows8 5.png]] | ||
*The MAC Address is the "Physical Address" listed in the table | *The MAC Address is the "Physical Address" listed in the table | ||
[[ | [[File:Windows8 6.png]] | ||
=== Windows XP | === Windows XP === | ||
*Click on the network icon in the lower right hand corner | *Click on the network icon in the lower right hand corner | ||
[[ | [[File:WindowsXP 1.png]] | ||
*In the window that pops up will be a "Support" tab, click on it | *In the window that pops up will be a "Support" tab, click on it | ||
[[ | [[File:WindowsXP 2.png]] | ||
*Click on "Details" | *Click on "Details" | ||
[[ | [[File:WindowsXP 3.png]] | ||
*The MAC Address is the Physical Address listed at the top | *The MAC Address is the Physical Address listed at the top | ||
[[ | [[File:WindowsXP 4.png]] | ||
=== OS X | === OS X === | ||
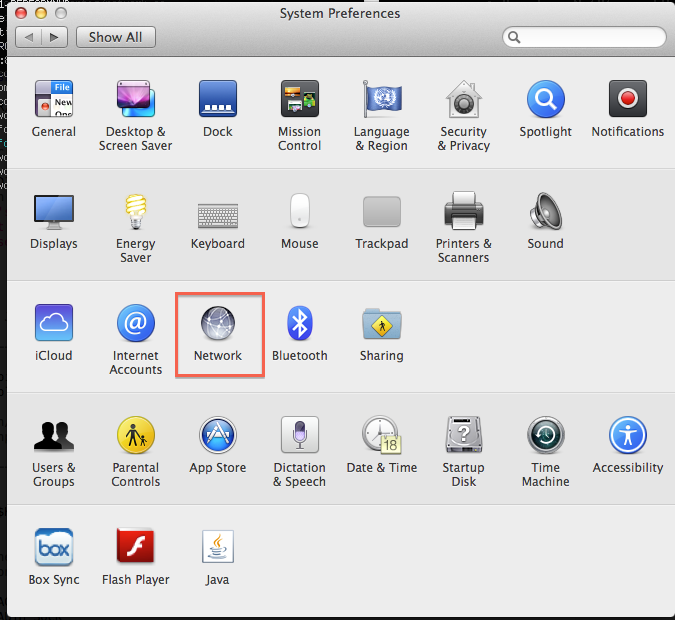
*Go to System Preferences and select Network | *Go to System Preferences and select Network | ||
[[ | [[File:OSX 1.png]] | ||
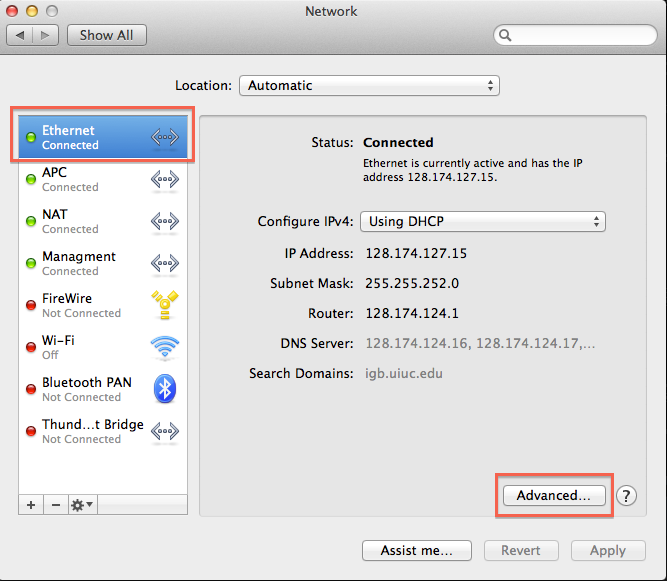
*Make sure Ethernet is selected on the left side menu and click on "Advanced" | *Make sure Ethernet is selected on the left side menu and click on "Advanced" | ||
[[ | [[File:OSX 2.png]] | ||
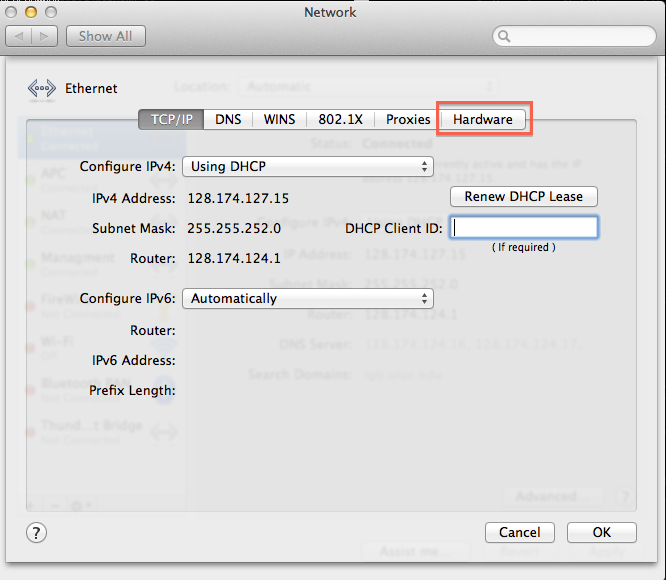
*Click on the far right tab called "Hardware" | *Click on the far right tab called "Hardware" | ||
[[ | [[File:OSX 3.png]] | ||
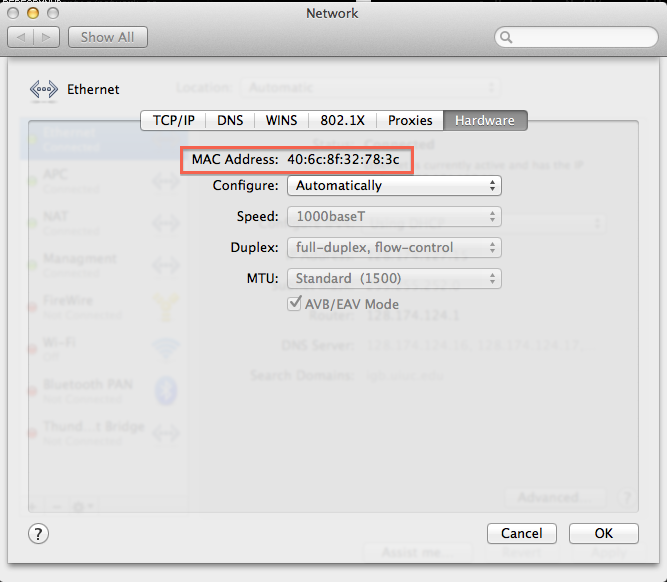
*Mac Address is listed at the top | *Mac Address is listed at the top | ||
[[ | [[File:OSX 4.png]] | ||
=== Linux | === Linux === | ||
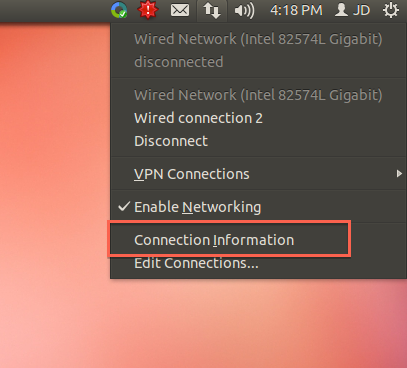
*Click on the Network Connection Icon in the upper right corner and select "Connection Information" | *Click on the Network Connection Icon in the upper right corner and select "Connection Information" | ||
[[ | [[File:Linux 1.png]] | ||
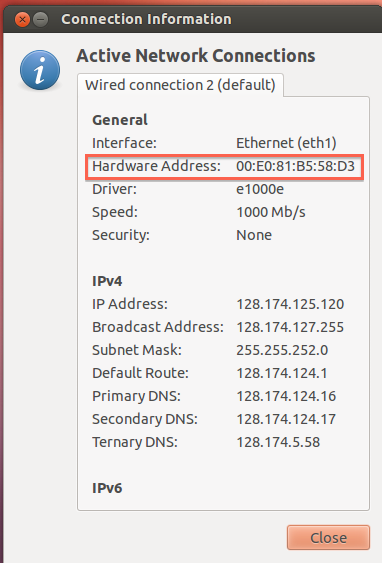
*The "Hardware Address" is listed in the table, that is the MAC Address | *The "Hardware Address" is listed in the table, that is the MAC Address | ||
[[ | [[File:Linux 2.png]] | ||
Revision as of 10:29, 17 February 2014
How to Find Hardware Address
- make sure your Ethernet cable is plugged in while completing these steps
- Hardware address can also be referred to as Mac Address or Physical Address
- Use the steps from the appropriate section below to find your computer's Mac Address,
- Once you have found it, enter into the field in the form. Please leave out hyphens and colons.
Windows 7
- At the bottom right corner of the screen click on Network > Open Network and Sharing Center
- Click on "Change Adapter Settings"
- Select "Local Area Connection"
- Click on "Details"
- The MAC Address is the "Physical Address" listed in the table
Windows 8
- On the tile screen, select the desktop tile
- In the lower right corner, right click on the network icon and choose "Open Network and Sharing Center"
- In the left column, choose "Change Adapter Settings"
- Select the Ethernet Connection
- Click on "Details"
- The MAC Address is the "Physical Address" listed in the table
Windows XP
- Click on the network icon in the lower right hand corner
- In the window that pops up will be a "Support" tab, click on it
- Click on "Details"
- The MAC Address is the Physical Address listed at the top
OS X
- Go to System Preferences and select Network
- Make sure Ethernet is selected on the left side menu and click on "Advanced"
- Click on the far right tab called "Hardware"
- Mac Address is listed at the top
Linux
- Click on the Network Connection Icon in the upper right corner and select "Connection Information"
- The "Hardware Address" is listed in the table, that is the MAC Address
