Xserver Setup: Difference between revisions
Jump to navigation
Jump to search
No edit summary Tags: mobile edit mobile web edit |
|||
| Line 35: | Line 35: | ||
*Click Next | *Click Next | ||
[[File:Xming install1.jpg]] | [[File:Xming install1.jpg|400px]] | ||
*Click Next | *Click Next | ||
[[File:Xming install2.jpg]] | [[File:Xming install2.jpg|400px]] | ||
*Click Next | *Click Next | ||
[[File:Xming install3.jpg]] | [[File:Xming install3.jpg|400px]] | ||
*Click Next | *Click Next | ||
[[File:Xming install4.jpg]] | [[File:Xming install4.jpg|400px]] | ||
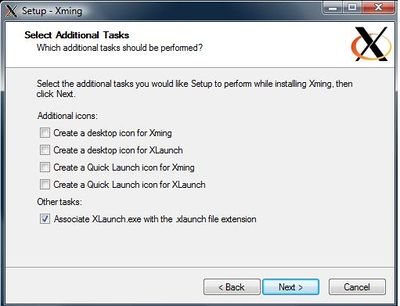
*Uncheck everything except for "Associate XLaunch.exe with the .xlaunch file extension" | *Uncheck everything except for "Associate XLaunch.exe with the .xlaunch file extension" | ||
[[File:Xming install5.jpg]] | [[File:Xming install5.jpg|400px]] | ||
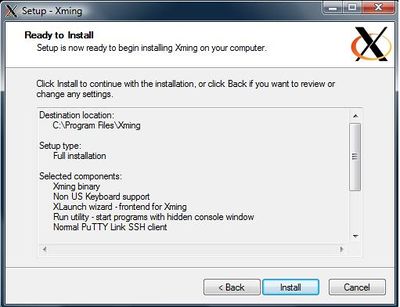
*Click Install | *Click Install | ||
[[File:Xming install6.jpg]] | [[File:Xming install6.jpg|400px]] | ||
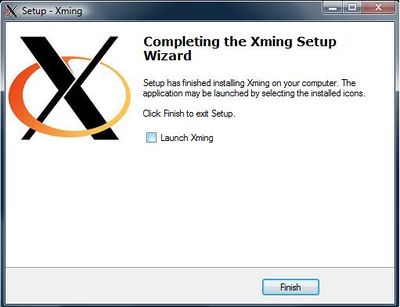
*Uncheck "Launch Xming". Click finish | *Uncheck "Launch Xming". Click finish | ||
[[File:Xming install7.jpg]] | [[File:Xming install7.jpg|400px]] | ||
=== Installing PuTTy === | === Installing PuTTy === | ||
| Line 66: | Line 66: | ||
*Click Next | *Click Next | ||
[[File:Putty install1.jpg]] | [[File:Putty install1.jpg|400px]] | ||
*Click Next | *Click Next | ||
[[File:Putty install2.jpg]] | [[File:Putty install2.jpg|400px]] | ||
*Click Next | *Click Next | ||
[[File:Putty install3.jpg]] | [[File:Putty install3.jpg|400px]] | ||
*Click Next | *Click Next | ||
[[File:Putty install4.jpg]] | [[File:Putty install4.jpg|400px]] | ||
*Click Install | *Click Install | ||
[[File:Putty install5.jpg]] | [[File:Putty install5.jpg|400px]] | ||
*Click Finish | *Click Finish | ||
[[File:Putty install6.jpg]] | [[File:Putty install6.jpg|400px]] | ||
*Run "putty.reg". At the warning that pops up click Yes. It will be similar to the following screenshot | *Run "putty.reg". At the warning that pops up click Yes. It will be similar to the following screenshot | ||
[[File:Putty.reg.jpg]] | [[File:Putty.reg.jpg|400px]] | ||
=== Connecting to X Server === | === Connecting to X Server === | ||
Revision as of 12:31, 10 October 2018
MAC OSX
OSX 10.5 through OS X 10.7
- XServer is already built into OSX
OSX 10.8 through 10.10
- Download XQuartz http://xquartz.macosforge.org/landing/
- Install XQuartz and be sure to restart the computer after the installation is done.
Connecting
- Open a terminal client and type in
ssh -X [yournetid]@[destination.server].edu
- The -X after "ssh" tells the computer to connect using xserver
- yournetid - is your university netid
- destination.server.edu - the server you would like to connect too (example: biocluster.igb.illinois.edu)
Windows with MobaXterm
- MobaXTerm includes an xserver. This is the easiest method on a windows computer
- Download and install MobaXterm at https://mobaxterm.mobatek.net/
Windows with PuTTY
- For users who prefer PuTTY. You will need to setup the program XMing
Download the following files
- Xming-6-9-0-31-setup.exe
- Putty-0.60-installer.exe
- putty.reg (Right Click to Save)
- Xserver.xlaunch (Right Click to Save)
Installing Xming
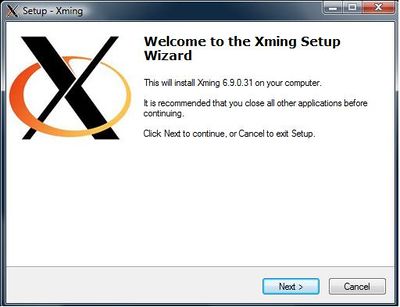
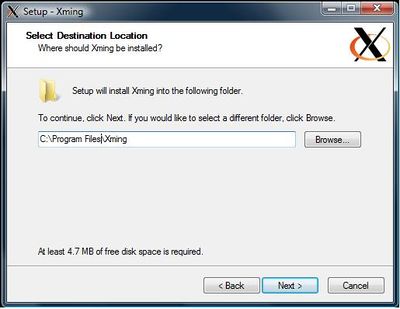
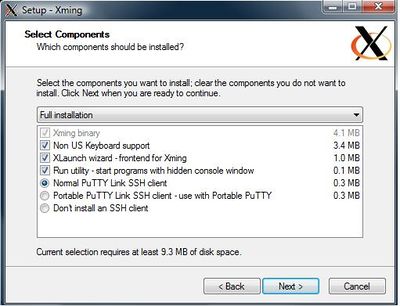
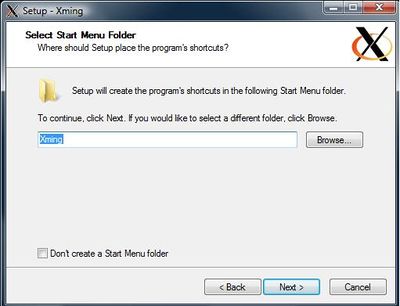
- Run "Xming-6-9-0-31-setup.exe" installer. Follow the screenshots below.
- Click Next
- Click Next
- Click Next
- Click Next
- Uncheck everything except for "Associate XLaunch.exe with the .xlaunch file extension"
- Click Install
- Uncheck "Launch Xming". Click finish
Installing PuTTy
- Run "putty-0.60-installer.exe" installer. Follow the screenshots below.
- Click Next
- Click Next
- Click Next
- Click Next
- Click Install
- Click Finish
- Run "putty.reg". At the warning that pops up click Yes. It will be similar to the following screenshot
Connecting to X Server
- Run "xserver.xlaunch". This is the Xming profile that is needed to connect properly use Xming with a server
- Run PuTTY by going to Start->Programs->PuTTY->PuTTY
- Type in the hostname you are connecting to then click Open.
- Type in your net ID for your username and press enter. Type in your IGB password and press enter.
- You are now connected. You should be able to run any xserver capable program.
