Printer Setup: Difference between revisions
Jump to navigation
Jump to search
| (150 intermediate revisions by 10 users not shown) | |||
| Line 1: | Line 1: | ||
[[File:Printer-svg.png|right|200px]] | |||
__TOC__ | |||
== Get Printer IP Address == | |||
*This will be listed on the display screen of the printer, labeled on the printer, or you can print a configuration page from the printer. | |||
*It will be in the form 128.174.XXX.XXX | |||
==Public Printers == | |||
This is a list of printers available for public use in the IGB. | |||
'''Color Printers''' | |||
{| class="wikitable" | |||
|- | |||
! Printer Name !! Location!! IP Address | |||
|- | |||
| lj-color-109-lab.igb.illinois.edu || 109 (Concourse) || 128.174.125.234 | |||
|- | |||
| lj-color-109.igb.illinois.edu || 109 (Concourse) || 128.174.124.227 | |||
|- | |||
| lj-color-1n.igb.illinois.edu || 1414 (First Floor North) ||128.174.127.145 | |||
|- | |||
| lj-color-1s.igb.illinois.edu || 1136 (First Floor South) || 128.174.127.91 | |||
|- | |||
| lj-color-1116.igb.illinois.edu || 1116 (First Floor South)|| 128.174.126.138 | |||
|- | |||
| lj-color-2n.igb.illinois.edu || 2414 (Second Floor North)||128.174.124.239 | |||
|- | |||
| lj-color-2s.igb.illinois.edu || 2136 (Second Floor South)||128.174.124.242 | |||
|- | |||
| lj-color-3n.igb.illinois.edu || 3414 (Third Floor North)||128.174.125.212 | |||
|- | |||
| lj-color-3s.igb.illinois.edu || 3136 (Third Floor South) ||128.174.124.241 | |||
|- | |||
| lj-color-3116.igb.illinois.edu || 3116 (Third Floor South) || 128.174.126.38 | |||
|} | |||
'''Black and White Printers''' | |||
{| class="wikitable" | |||
|- | |||
! Printer Name !! Location !! IP Address | |||
|- | |||
| lj-black-1500.igb.illinois.edu || 1500 (First Floor North) || 128.174.126.218 | |||
|- | |||
| lj-black-1s.igb.illinois.edu || 1116 (First Floor South) ||128.174.127.89 | |||
|- | |||
| lj-black-2n-2.igb.illinois.edu || 2414 (Second Floor North) ||128.174.125.181 | |||
|- | |||
| lj-black-3n.igb.illinois.edu || 3414 (Third Floor North)||128.174.124.240 | |||
|- | |||
| lj-black-3s.igb.illinois.edu ||3136 (Third Floor South) || 128.174.125.210 | |||
|} | |||
== Driver and Printer Installation == | |||
<div class="toccolours mw-collapsible mw-collapsed" style="width:900px"> | |||
=== MacOS === | |||
<div class="mw-collapsible-content"> | |||
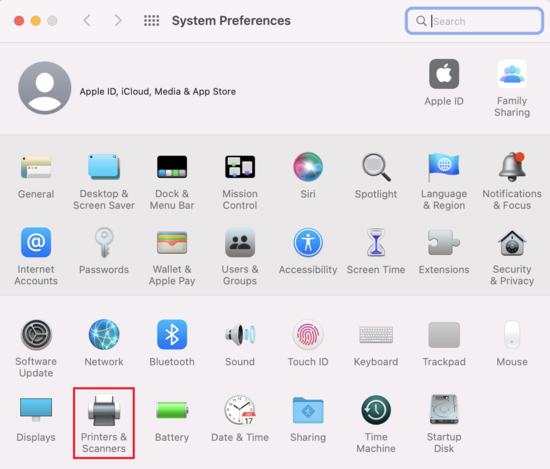
*Select Printers & Scanners from the System Preferences window | |||
*;[[File:Mac1.png|550px]] | |||
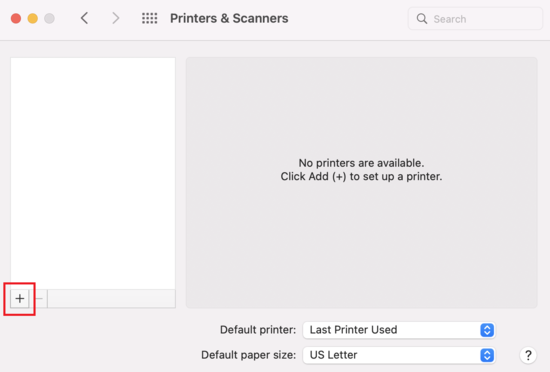
*Click the [+] button at the bottom of the left column | |||
*;[[File:Mac2.png|550px]] | |||
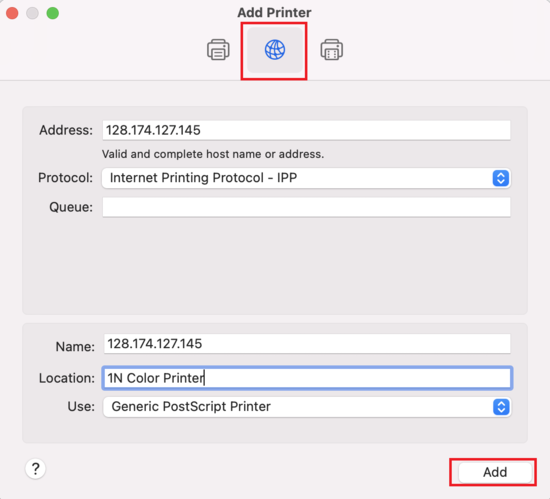
*Make sure you have selected the IP symbol at the top. | |||
*Select "Internet Printing Protocol - IPP" | |||
*Fill out the address. It will be like: 128.174.XXX.XXX | |||
*Enter the name and location of the printer. (This can be anything that you want.) | |||
*Select the driver for your printer. Find your manufacturer and model from the list. Example: HP LaserJet 5000 Series PS | |||
**NOTE: If the manufacturer and model is not available in the list, choose "Generic PostScript Printer" | |||
*Click Add | |||
*;[[File:Mac3.png|550px]] | |||
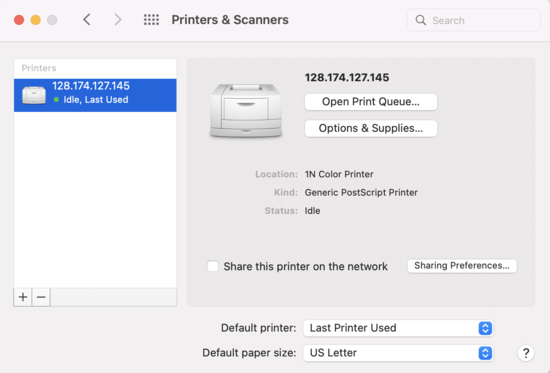
*Your new printer should appear on the left column of the Print & Fax window. | |||
*;[[File:Mac5.png|550px]] | |||
</div></div> | |||
<div class="toccolours mw-collapsible mw-collapsed" style="width:900px"> | |||
* | === Windows 10 === | ||
*Click Next. | <div class="mw-collapsible-content"> | ||
[[ | *Download the correct drivers. For most HP printers, the drivers below will work. | ||
**Windows 10/11 32 Bit - [https://help.igb.illinois.edu/images/0/0b/Upd-ps-x32-7.0.1.24923.exe Upd-ps-x32-7.0.1.24923.exe] | |||
**Windows 10/11 64 Bit - [https://help.igb.illinois.edu/images/7/71/Upd-ps-x64-7.0.1.24923.exe Upd-ps-x64-7.0.1.24923.exe] | |||
**If your printer will not work with the HP Universal Printer Driver or you are connecting to a non- HP printer, you will need to go to the Printer Manufacture's website to download the correct drivers. For HP, you can go to [http://welcome.hp.com/country/us/en/support.html?pageDisplay=drivers Drivers] In the search box type in the model of your printer and click the search button. Select your operating system from the list. Now download the driver for your printer (We recommend downloading the '''PostsScript Driver'''). | |||
**Once you've downloaded the drivers you will need to double click on the file. It should extract the file into C:\HP Universal Print Driver PostScript v5.1.0.1 or something similar for HP printers. | |||
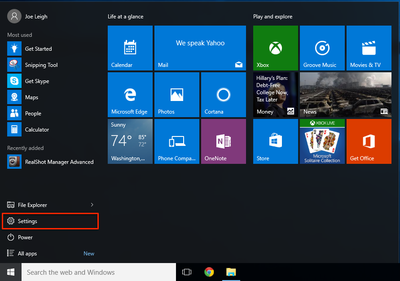
*Open the Settings window by going to: Start -> Settings | |||
*;[[File:Win10PrinterSetup1.png|400px]] | |||
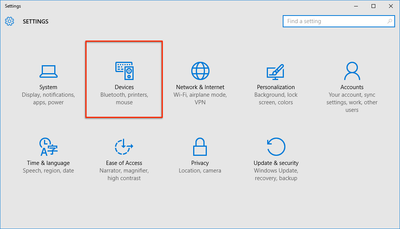
*Click "Devices" | |||
*;[[File:Win10PrinterSetup2.png|400px]] | |||
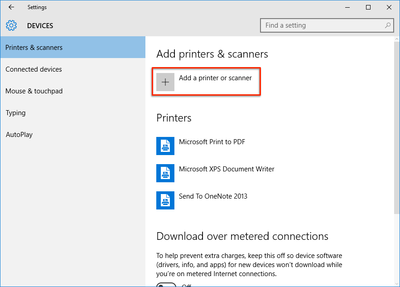
*Click "Add a printer or scanner" | |||
*;[[File:Win10PrinterSetup3.png|400px]] | |||
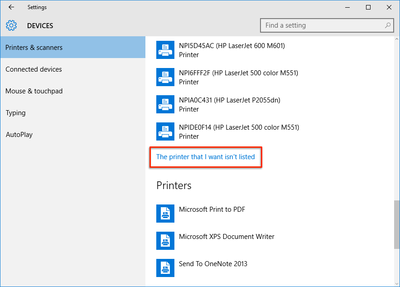
*Scroll down and click "The printer that I want isn't listed" | |||
*;[[File:Win10PrinterSetup4.png|400px]] | |||
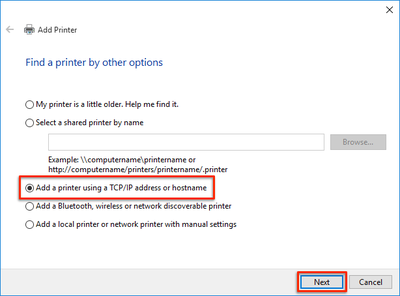
*Select "Add a printer using a TCP/IP address or hostname," then click "Next" | |||
*;[[File:Win10PrinterSetup5.png|400px]] | |||
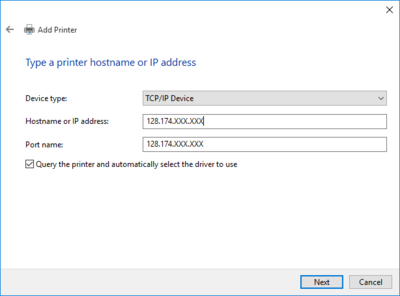
*Input the IP Address of the printer you want to add and click "Next" | |||
*;[[File:Win10PrinterSetup6.PNG|400px]] | |||
*If the drivers for the printer are not already available on your computer, a dialog box will pop up. First click "Windows Update" and after it is done updating, select your printer from the list and click "Next" | |||
*If the printer is not listed click on '''Have Disk...''' '''Browse''' Go to the directory where you saved your drivers and select it. Click '''OK'''. Now you should see your printer in the list. | |||
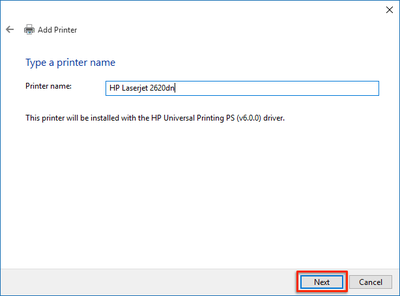
*Accept the printer name and click next | |||
*;[[File:Win10PrinterSetup11.png|400px]] | |||
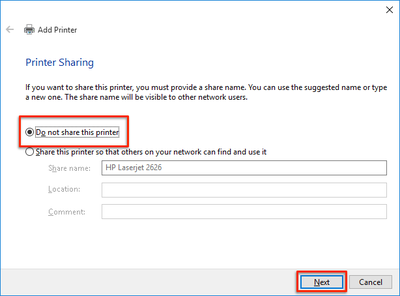
*Select "Do not share this printer," then click "Next" | |||
*;[[File:Win10PrinterSetup8.png|400px]] | |||
*Click "Print a Test Page". Once the page comes out, click "Finish" | |||
*;[[File:Win10PrinterSetup9.png|400px]] | |||
*Double check to make sure the new printer is installed properly by going back to Devices and Printers as you did in the beginning | |||
*;[[File:Win10PrinterSetup10.png|400px]] | |||
</div></div> | |||
<div class="toccolours mw-collapsible mw-collapsed" style="width:900px"> | |||
=== Windows 11 === | |||
<div class="mw-collapsible-content"> | |||
*Download the correct drivers. For most HP printers, the drivers below will work. | |||
**Windows 10/11 32 Bit - [https://help.igb.illinois.edu/images/0/0b/Upd-ps-x32-7.0.1.24923.exe Upd-ps-x32-7.0.1.24923.exe] | |||
**Windows 10/11 64 Bit - [https://help.igb.illinois.edu/images/7/71/Upd-ps-x64-7.0.1.24923.exe Upd-ps-x64-7.0.1.24923.exe] | |||
**If your printer will not work with the HP Universal Printer Driver or you are connecting to a non- HP printer, you will need to go to the Printer Manufacture's website to download the correct drivers. For HP, you can go to [http://welcome.hp.com/country/us/en/support.html?pageDisplay=drivers Drivers] In the search box type in the model of your printer and click the search button. Select your operating system from the list. Now download the driver for your printer (We recommend downloading the '''PostsScript Driver'''). | |||
**Once you've downloaded the drivers you will need to double click on the file. It should extract the file into C:\HP Universal Print Driver PostScript v5.1.0.1 or something similar for HP printers. | |||
*Open the Settings window by going to: Start -> Settings | |||
*;[[File:PrinterW11.jpg|400px]] | |||
*Click "Bluetooth & Devices" and then "Printers & scanners" | |||
*;[[File:PrinterW11-1.jpg|500px]] | |||
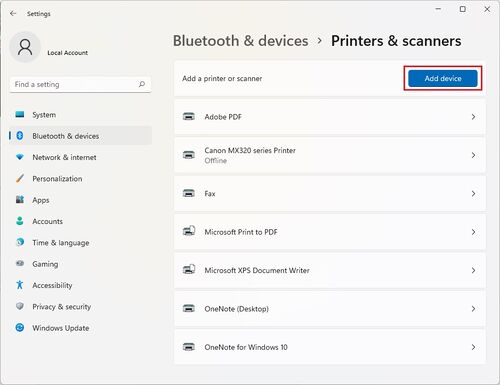
*Click "Add a printer or scanner" | |||
*;[[File:PrinterW11-2.jpg|500px]] | |||
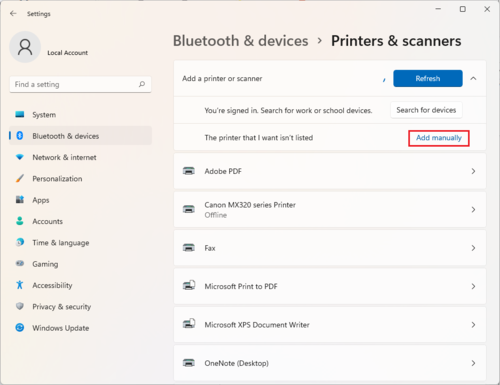
*Click "Add manually" next to "The printer that I want isn't listed" | |||
*;[[File:PrinterW11-3.png|500px]] | |||
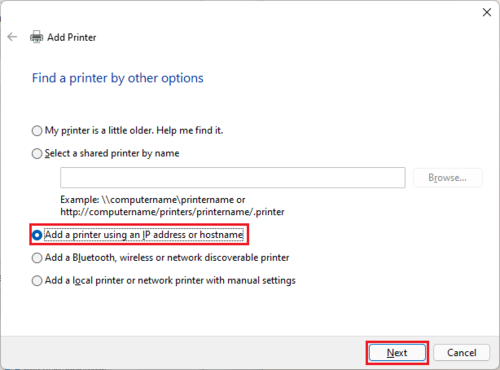
*Select "Add a printer using an IP address or hostname," then click "Next" | |||
*;[[File:PrinterW11-4.png|500px]] | |||
*Choose "TCP/IP Device" from the drop down options, input the IP Address of the printer you want to add and click "Next" | |||
*;[[File:PrinterW11-5.PNG|500px]] | |||
*If the drivers for the printer are not already available on your computer, a dialog box will pop up. First click "Windows Update" and after it is done updating, select your printer from the list and click "Next" | |||
*If the printer is not listed click on '''Have Disk...''' '''Browse''' Go to the directory where you saved your drivers and select it. Click '''OK'''. Now you should see your printer in the list. | |||
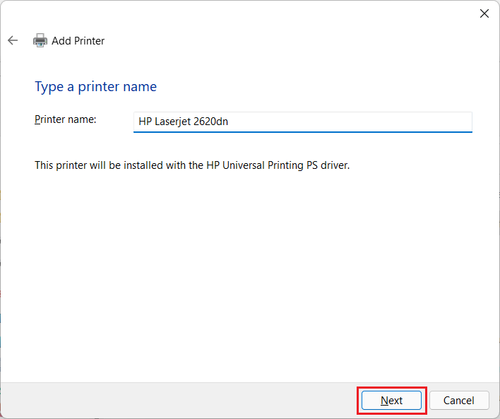
*Accept the printer name and click next | |||
*;[[File:PrinterW11-6.png|500px]] | |||
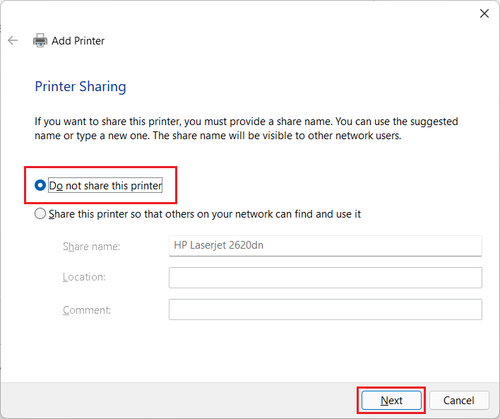
*Select "Do not share this printer," then click "Next" | |||
*;[[File:PrinterW11-8.png|500px]] | |||
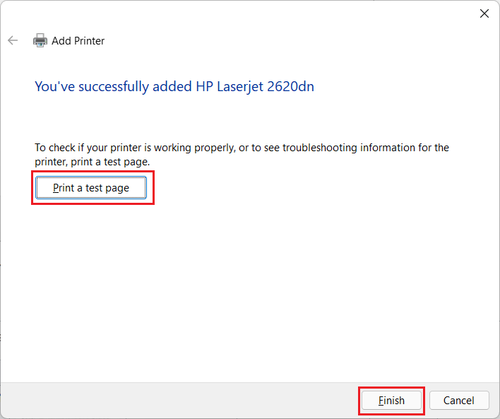
*Click "Print a Test Page". Once the page comes out, click "Finish" | |||
*;[[File:PrinterW11-9.png|500px]] | |||
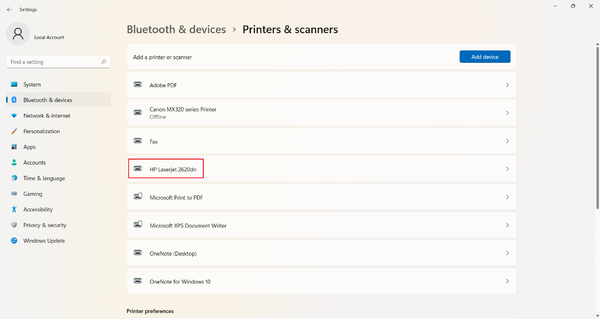
*Double check to make sure the new printer is installed properly by going back to Devices and Printers as you did in the beginning | |||
*;[[File:PrinterW11-10.png|600px]] | |||
</div></div> | |||
<div class="toccolours mw-collapsible mw-collapsed" style="width:900px"> | |||
=== Ubuntu === | |||
<div class="mw-collapsible-content"> | |||
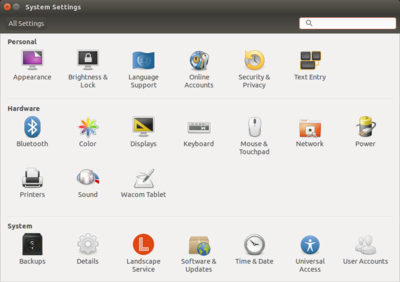
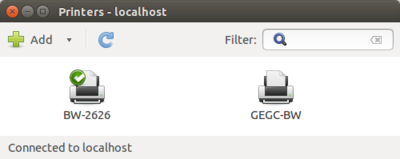
*Select Printers from the System Settings window | |||
*;[[File:linuxprint1.PNG|400px]] | |||
*Click the Add button at the top-left of the window | |||
*;[[File:linuxprint2.PNG|400px]] | |||
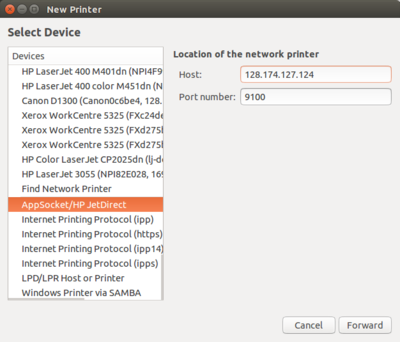
*EITHER: For most HP printers: | |||
**Click the arrow next to Network Printer. | |||
**Select "AppSocket/HP JetDirect" | |||
**Fill out the host address. It will be like: 128.174.XXX.XXX. Click Forward. | |||
**;[[File:linuxprint3a1.PNG|400px]] | |||
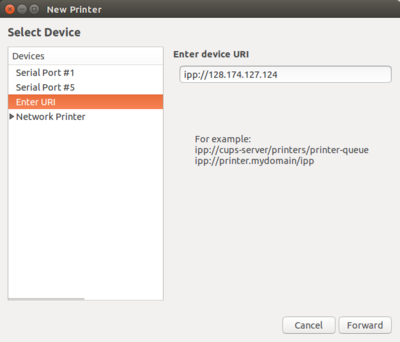
*OR: For other printers: | |||
** Select Enter URI. Enter "ipp://" followed by the IP address. Click Forward. | |||
**;[[File:linuxprint3b1.PNG|400px]] | |||
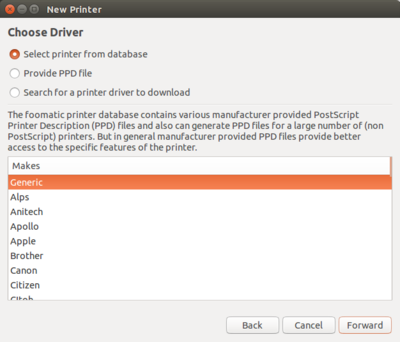
**Choose the manufacturer of your printer in the list and click Forward. | |||
**;[[File:linuxprint3b2.PNG|400px]] | |||
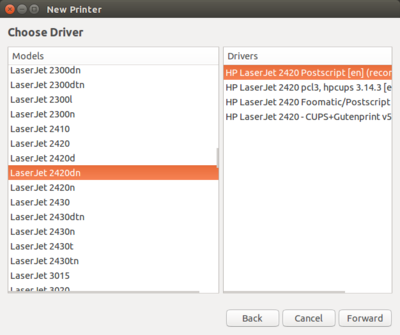
**Choose the model of your printer on the left, then choose a PostScript driver on the right. Click Forward. | |||
**;[[File:linuxprint3b3.PNG|400px]] | |||
*If there are additional features on your printer, you may select them on the Installable Options window. Click Forward. | |||
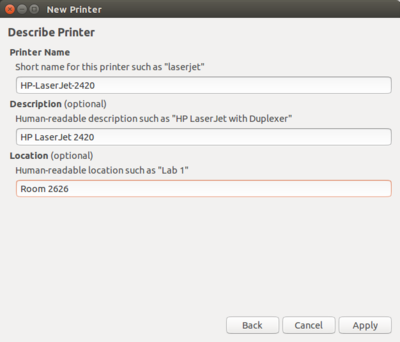
*On the Describe Printer window, enter a description and location for the printer. (This can be anything that you want.) Click Apply. | |||
*;[[File:linuxprint4.PNG|400px]] | |||
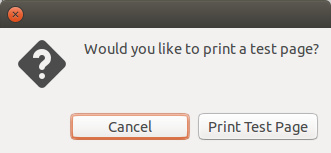
*When prompted, print a test page to confirm setup. | |||
*;[[File:linuxprint5.PNG|400px]] | |||
</div></div> | |||
== Removing a Printer == | |||
If you would like to remove a printer, please follow the directions below. | |||
<div class="toccolours mw-collapsible mw-collapsed" style="width:900px"> | |||
=== MacOS === | |||
<div class="mw-collapsible-content"> | |||
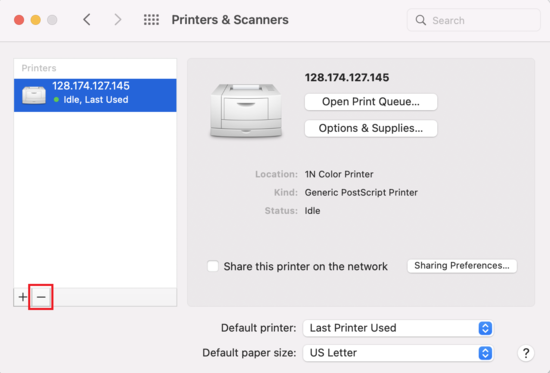
*Select Printers & Scanners from the System Preferences window | |||
*;[[File:Mac1.png|550px]] | |||
*Select the printer you would like to remove. | |||
*Click the [-] button at the bottom of the left column | |||
*;[[File:Mac6.png|550px]] | |||
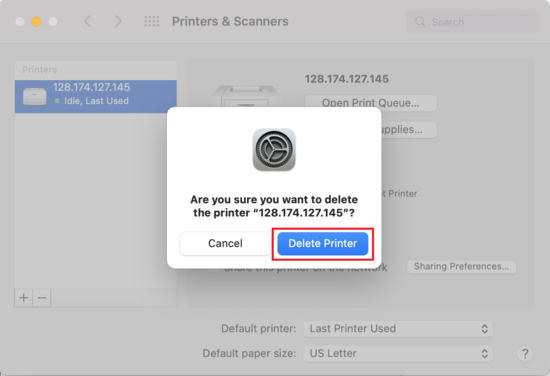
*Click Delete Printer | |||
*;[[File:Mac7.png|550px]] | |||
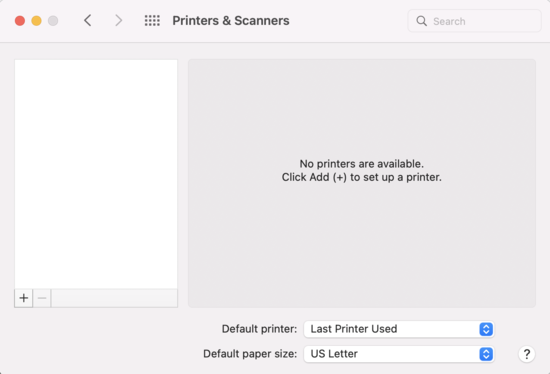
*The printer should now be removed from the list. | |||
*;[[File:Mac8.png|550px]] | |||
</div></div> | |||
<div class="toccolours mw-collapsible mw-collapsed" style="width:900px"> | |||
[[ | === Windows 10 === | ||
<div class="mw-collapsible-content"> | |||
*Open the Settings window by going to: Start -> Settings | |||
*;[[File:Win10PrinterSetup1.png|400px]] | |||
*Click "Devices" | |||
*;[[File:Win10PrinterSetup2.png|400px]] | |||
*Click "Printers & Scanners" on the left hand side of the window. | |||
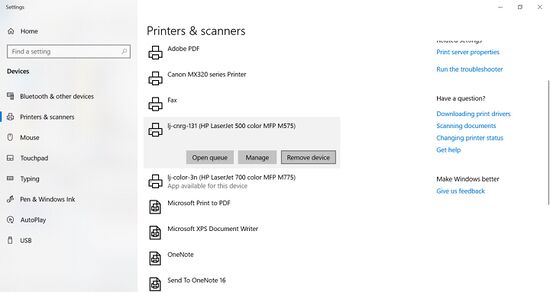
*Locate the printer you would like to remove, click on it, and then click "Remove Device" | |||
[[File:Untitled.jpg|550px]] | |||
</div></div> | |||
<div class="toccolours mw-collapsible mw-collapsed" style="width:900px"> | |||
=== Windows 11 === | |||
<div class="mw-collapsible-content"> | |||
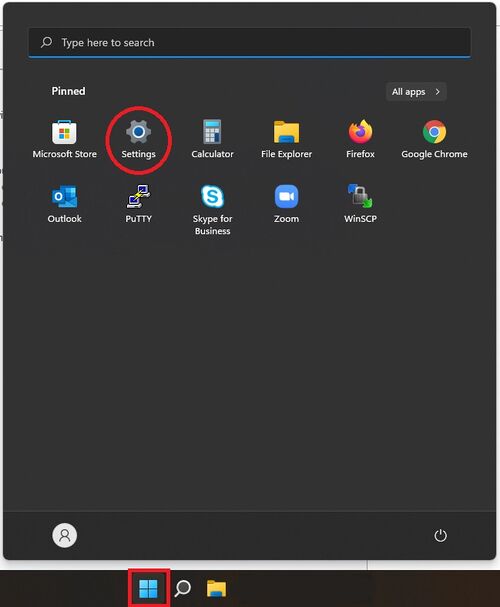
*Open the Settings window by going to: Start -> Settings | |||
*;[[File:PrinterW11.jpg|500px]] | |||
*Click "Bluetooth & Devices" and then "Printers & scanners" | |||
*;[[File:PrinterW11-1.jpg|500px]] | |||
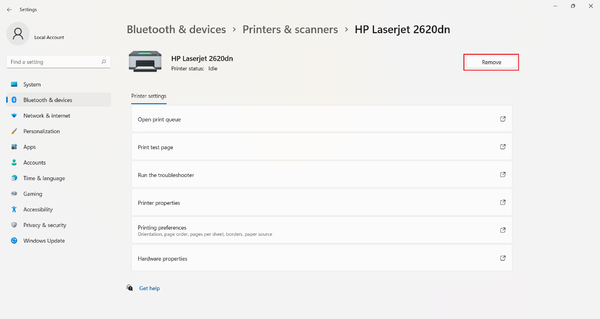
*Locate the printer you would like to remove, click on it, and then click "Remove Device" | |||
[[File:PrinterW11-12.png|600px]] | |||
</div></div> | |||
<small>Page Reviewed: 11/16/21</small> | |||
Latest revision as of 11:37, 6 November 2024
Get Printer IP Address
- This will be listed on the display screen of the printer, labeled on the printer, or you can print a configuration page from the printer.
- It will be in the form 128.174.XXX.XXX
Public Printers
This is a list of printers available for public use in the IGB.
Color Printers
| Printer Name | Location | IP Address |
|---|---|---|
| lj-color-109-lab.igb.illinois.edu | 109 (Concourse) | 128.174.125.234 |
| lj-color-109.igb.illinois.edu | 109 (Concourse) | 128.174.124.227 |
| lj-color-1n.igb.illinois.edu | 1414 (First Floor North) | 128.174.127.145 |
| lj-color-1s.igb.illinois.edu | 1136 (First Floor South) | 128.174.127.91 |
| lj-color-1116.igb.illinois.edu | 1116 (First Floor South) | 128.174.126.138 |
| lj-color-2n.igb.illinois.edu | 2414 (Second Floor North) | 128.174.124.239 |
| lj-color-2s.igb.illinois.edu | 2136 (Second Floor South) | 128.174.124.242 |
| lj-color-3n.igb.illinois.edu | 3414 (Third Floor North) | 128.174.125.212 |
| lj-color-3s.igb.illinois.edu | 3136 (Third Floor South) | 128.174.124.241 |
| lj-color-3116.igb.illinois.edu | 3116 (Third Floor South) | 128.174.126.38 |
Black and White Printers
| Printer Name | Location | IP Address |
|---|---|---|
| lj-black-1500.igb.illinois.edu | 1500 (First Floor North) | 128.174.126.218 |
| lj-black-1s.igb.illinois.edu | 1116 (First Floor South) | 128.174.127.89 |
| lj-black-2n-2.igb.illinois.edu | 2414 (Second Floor North) | 128.174.125.181 |
| lj-black-3n.igb.illinois.edu | 3414 (Third Floor North) | 128.174.124.240 |
| lj-black-3s.igb.illinois.edu | 3136 (Third Floor South) | 128.174.125.210 |
Driver and Printer Installation
MacOS
- Select Printers & Scanners from the System Preferences window
- Click the [+] button at the bottom of the left column
- Make sure you have selected the IP symbol at the top.
- Select "Internet Printing Protocol - IPP"
- Fill out the address. It will be like: 128.174.XXX.XXX
- Enter the name and location of the printer. (This can be anything that you want.)
- Select the driver for your printer. Find your manufacturer and model from the list. Example: HP LaserJet 5000 Series PS
- NOTE: If the manufacturer and model is not available in the list, choose "Generic PostScript Printer"
- Click Add
- Your new printer should appear on the left column of the Print & Fax window.
Windows 10
- Download the correct drivers. For most HP printers, the drivers below will work.
- Windows 10/11 32 Bit - Upd-ps-x32-7.0.1.24923.exe
- Windows 10/11 64 Bit - Upd-ps-x64-7.0.1.24923.exe
- If your printer will not work with the HP Universal Printer Driver or you are connecting to a non- HP printer, you will need to go to the Printer Manufacture's website to download the correct drivers. For HP, you can go to Drivers In the search box type in the model of your printer and click the search button. Select your operating system from the list. Now download the driver for your printer (We recommend downloading the PostsScript Driver).
- Once you've downloaded the drivers you will need to double click on the file. It should extract the file into C:\HP Universal Print Driver PostScript v5.1.0.1 or something similar for HP printers.
- Open the Settings window by going to: Start -> Settings
- Click "Devices"
- Click "Add a printer or scanner"
- Scroll down and click "The printer that I want isn't listed"
- Select "Add a printer using a TCP/IP address or hostname," then click "Next"
- Input the IP Address of the printer you want to add and click "Next"
- If the drivers for the printer are not already available on your computer, a dialog box will pop up. First click "Windows Update" and after it is done updating, select your printer from the list and click "Next"
- If the printer is not listed click on Have Disk... Browse Go to the directory where you saved your drivers and select it. Click OK. Now you should see your printer in the list.
- Accept the printer name and click next
- Select "Do not share this printer," then click "Next"
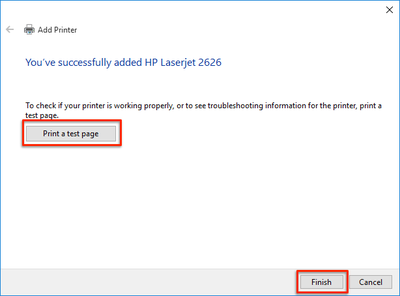
- Click "Print a Test Page". Once the page comes out, click "Finish"
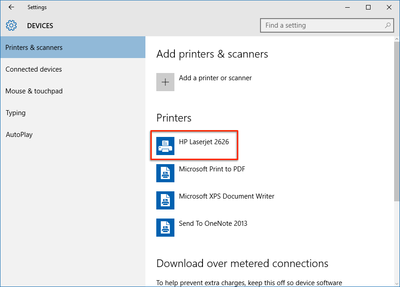
- Double check to make sure the new printer is installed properly by going back to Devices and Printers as you did in the beginning
Windows 11
- Download the correct drivers. For most HP printers, the drivers below will work.
- Windows 10/11 32 Bit - Upd-ps-x32-7.0.1.24923.exe
- Windows 10/11 64 Bit - Upd-ps-x64-7.0.1.24923.exe
- If your printer will not work with the HP Universal Printer Driver or you are connecting to a non- HP printer, you will need to go to the Printer Manufacture's website to download the correct drivers. For HP, you can go to Drivers In the search box type in the model of your printer and click the search button. Select your operating system from the list. Now download the driver for your printer (We recommend downloading the PostsScript Driver).
- Once you've downloaded the drivers you will need to double click on the file. It should extract the file into C:\HP Universal Print Driver PostScript v5.1.0.1 or something similar for HP printers.
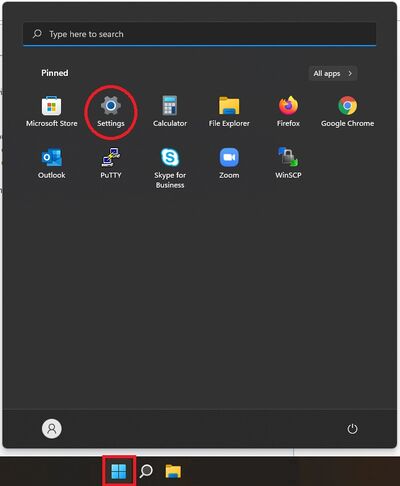
- Open the Settings window by going to: Start -> Settings
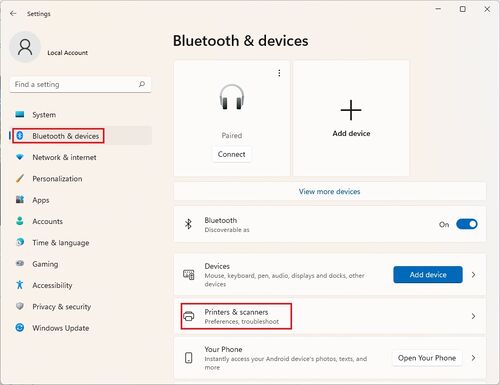
- Click "Bluetooth & Devices" and then "Printers & scanners"
- Click "Add a printer or scanner"
- Click "Add manually" next to "The printer that I want isn't listed"
- Select "Add a printer using an IP address or hostname," then click "Next"
- Choose "TCP/IP Device" from the drop down options, input the IP Address of the printer you want to add and click "Next"
- If the drivers for the printer are not already available on your computer, a dialog box will pop up. First click "Windows Update" and after it is done updating, select your printer from the list and click "Next"
- If the printer is not listed click on Have Disk... Browse Go to the directory where you saved your drivers and select it. Click OK. Now you should see your printer in the list.
- Accept the printer name and click next
- Select "Do not share this printer," then click "Next"
- Click "Print a Test Page". Once the page comes out, click "Finish"
- Double check to make sure the new printer is installed properly by going back to Devices and Printers as you did in the beginning
Ubuntu
- Select Printers from the System Settings window
- Click the Add button at the top-left of the window
- EITHER: For most HP printers:
- OR: For other printers:
- If there are additional features on your printer, you may select them on the Installable Options window. Click Forward.
- On the Describe Printer window, enter a description and location for the printer. (This can be anything that you want.) Click Apply.
- When prompted, print a test page to confirm setup.
Removing a Printer
If you would like to remove a printer, please follow the directions below.
MacOS
Windows 10
Windows 11
Page Reviewed: 11/16/21
