Core Server Access: Difference between revisions
Jump to navigation
Jump to search
| (4 intermediate revisions by the same user not shown) | |||
| Line 2: | Line 2: | ||
* Purpose: Temporary store data generated by the core facilities instruments | * Purpose: Temporary store data generated by the core facilities instruments | ||
* Access: You must have an active Core Facilities account. Information can be found at [https://www.igb.illinois.edu/corefacilities https://www.igb.illinois.edu/corefacilities] | |||
* Hostname: '''core-server.igb.illinois.edu''' | * Hostname: '''core-server.igb.illinois.edu''' | ||
* Username: Your campus NetID | * Username: Your campus NetID | ||
| Line 61: | Line 62: | ||
*The core-server is mounted on the biologin nodes at /private_stores/core-server. | *The core-server is mounted on the biologin nodes at /private_stores/core-server. | ||
*It is read-only | *It is read-only, meaning you can only transfer data from the core-server to Biocluster. You cannot transfer any data from Biocluster to the core-server. | ||
= Backups = | = Backups = | ||
| Line 69: | Line 70: | ||
== Restore data using snapshots == | == Restore data using snapshots == | ||
=== Windows === | === Windows === | ||
[[File:File-server-previous-versions.jpg|right|border|300px]] | |||
*To restore from Windows, go to the folder where the data is missing. Right click on that folder and select '''Properties'''. Then select '''Previous Versions''' tab. It should list previous versions of the folder you select. | *To restore from Windows, go to the folder where the data is missing. Right click on that folder and select '''Properties'''. Then select '''Previous Versions''' tab. It should list previous versions of the folder you select. | ||
* Double click on the snapshot you want. Then select the files and directories and copy them back to their original location. | * Double click on the snapshot you want. Then select the files and directories and copy them back to their original location. | ||
* The snapshots get erased every '''10''' days. If you do not copy the data back, then you will not be restoring the data and the snapshot will eventually be lost. | * The snapshots get erased every '''10''' days. If you do not copy the data back, then you will not be restoring the data and the snapshot will eventually be lost. | ||
<br clear=all> | |||
=== OS X or SFTP === | === OS X or SFTP === | ||
* Navigate to the '''SNAPSHOT''' directory in the '''Groups''' folders | * Navigate to the '''SNAPSHOT''' directory in the '''Groups''' folders | ||
Latest revision as of 09:01, 17 August 2023
- Purpose: Temporary store data generated by the core facilities instruments
- Access: You must have an active Core Facilities account. Information can be found at https://www.igb.illinois.edu/corefacilities
- Hostname: core-server.igb.illinois.edu
- Username: Your campus NetID
- Password: Your IGB Password. If you do not know your IGB password, you can reset it by going to https://illinoisauth.igb.illinois.edu/password
Traditional Connection (Samba)
- This is an easy way to connect when you are physically on UofI campus.
- If you are not on campus, you will first need to connect to the campus Cisco VPN. There is a guide at https://answers.uillinois.edu/illinois/page.php?id=98773'
Connect From Windows
- This is an easy way to connect when inside IGB or campus. This is not a secure connection and it will not work outside campus
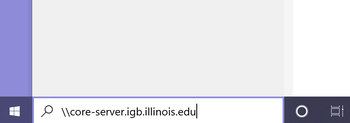
- In Windows 7/10: Click on the Windows Icon in the lower left of your desktop, enter \\core-server.igb.illinois.edu and hit Enter on your keyboard.
- Enter your IGB username and password.
Connection Problems
If you are on a computer that is on the UIUC or UOFI domain, make sure you do the following:
- Put IGB\YourNetID in the Username field
- Make sure the Domain is listed as IGB
- Put in your password
Connect From OSX
- Click on Go >> Connect to Server... >> type smb://core-server.igb.illinois.edu for the server address and click connect.
- Select the folder you would like to connect to from the drop down list and click OK
- Use your IGB username and password and click OK.
SFTP Protocol
- The SFTP protocol will work from on and off campus without the need for the campus Cisco VPN
Windows
- WinSCP allows you to connect to the core-server from anywhere in the world.
- Download WinSCP installation package from http://winscp.net/eng/download.php and install it.
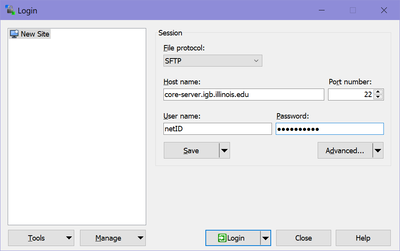
- Once installed Run WinSCP >> enter core-server.igb.illinois.edu for the Host name >> Enter your IGB user name and password and click Login
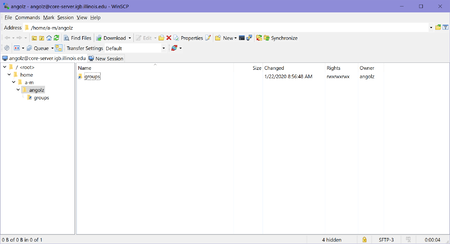
- Once you hit "Login", you should be connected to the file server, as shown below.
OS X
- To download Cyberduck go to http://cyberduck.io and click on the large Zip icon to download.
- Once Cyberduck is installed on OSX you may start the program.
- Click on Open Connection.
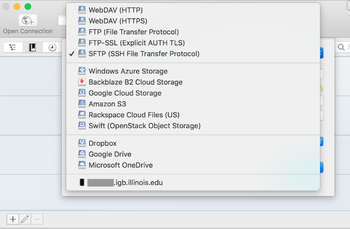
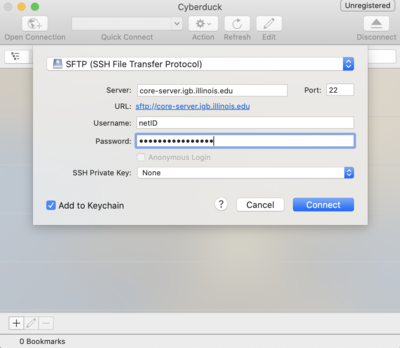
- From the drop down menu at the top of the popup window select SFTP(SSH File Transfer Protocol)
- Now in the Server: input box enter core-server.igb.illinois.edu and for Username and password enter your IGB credentials.
- Click Connect.
- You may now drag and drop files in and out of your file server folder.
Transferring to Biocluster
- The core-server is mounted on the biologin nodes at /private_stores/core-server.
- It is read-only, meaning you can only transfer data from the core-server to Biocluster. You cannot transfer any data from Biocluster to the core-server.
Backups
- The core-server has only a daily snapshot of the filesystem each evening. There is 10 days worth a snapshots. A user is able to go back to a snapshot and copy the data back to their original location in case of accidental deletion.
- There is no long term backup of data on this machine due to the size of data
Restore data using snapshots
Windows
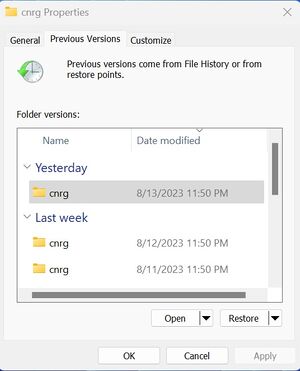
- To restore from Windows, go to the folder where the data is missing. Right click on that folder and select Properties. Then select Previous Versions tab. It should list previous versions of the folder you select.
- Double click on the snapshot you want. Then select the files and directories and copy them back to their original location.
- The snapshots get erased every 10 days. If you do not copy the data back, then you will not be restoring the data and the snapshot will eventually be lost.
OS X or SFTP
- Navigate to the SNAPSHOT directory in the Groups folders
- Select the date for the data you want to restore
- Once you have found your data, copy it back to its original location.
- The snapshots get erased every 10 days. If you do not copy the data back, then you will not be restoring the data and the snapshot will eventually be lost.
Restore data after 10 days
- There is no backup of data greater than 10 days due to the amount of data that is stored on the server
