Hardware Address: Difference between revisions
Added instructions for Windows 10 |
Edited for clarity |
||
| (3 intermediate revisions by one other user not shown) | |||
| Line 1: | Line 1: | ||
A hardware address, also known as a physical address or MAC address, is a sequence of twelve letters and numbers which are used to identify a computer on a network. We will ask you for your Hardware Address in order to get your computer connected to our wired network. | |||
== How to find your hardware address == | |||
Use the steps from the appropriate section below to find your computer's Mac Address. '''Make sure your network cable is plugged in while completing these steps.''' If your network cable is not plugged in, you may not be able to see the hardware address. | |||
=== Windows | === Windows 10 === | ||
In the lower right corner of your screen, right click on the network icon and choose "Open Network and Sharing Center" | |||
[[File:Win10HardwareAddress1.png|400px]] | |||
In the lefthand column, choose "Change Adapter Settings" | |||
[[File:Win10HardwareAddress2.png|400px|Win10HardwareAddress2.png]] | |||
Double-click the "Ethernet" connection. If you see multiple connections on this screen, make sure not to select one labelled "Wi-Fi." | |||
[[File:Win10HardwareAddress3.png|400px]] | |||
Click on "Details" | |||
[[File:Win10HardwareAddress4.png|400px]] | |||
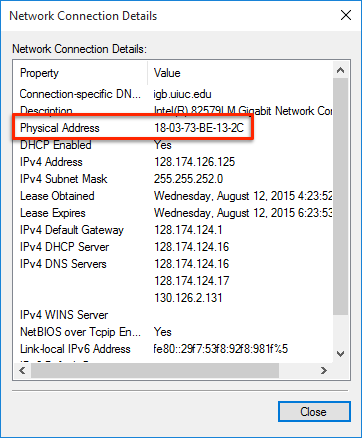
The hardware address is the "Physical Address" listed in the table in this window | |||
[[File: | [[File:Win10HardwareAddress5.png|400px]] | ||
=== Windows 7 === | |||
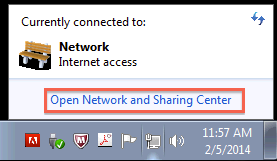
At the bottom right corner of the screen click on Network > Open Network and Sharing Center | |||
[[File: | [[File:Windows7 1.png|400px]] | ||
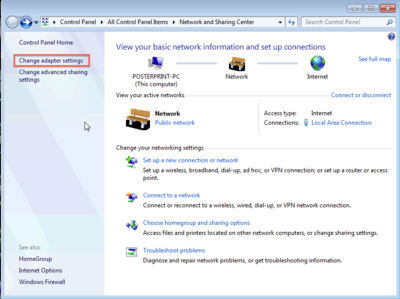
Click on "Change Adapter Settings" | |||
[[File: | [[File:Windows7 2.png|400px]] | ||
Select "Local Area Connection" | |||
[[File: | [[File:Windows7 3.png|400px]] | ||
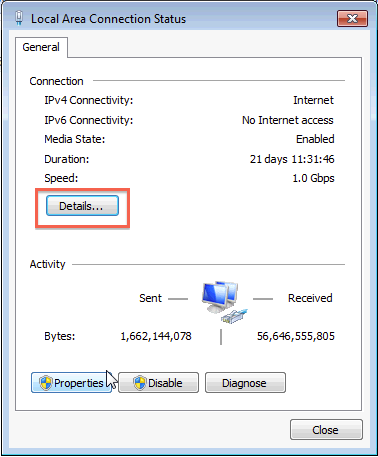
Click on "Details" | |||
[[File: | [[File:Windows7 4.png|400px]] | ||
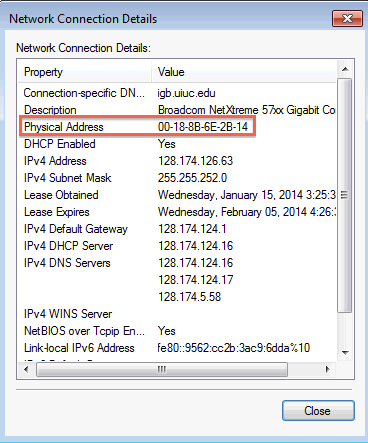
The hardware address is the "Physical Address" listed in the table in this window | |||
[[File:Windows7 5.png|400px]] | |||
=== macOS === | |||
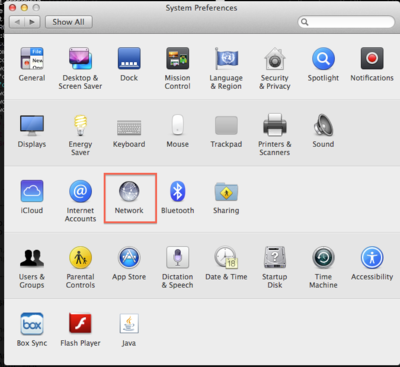
Open System Preferences and select Network | |||
[[File: | [[File:OSX 1.png|400px]] | ||
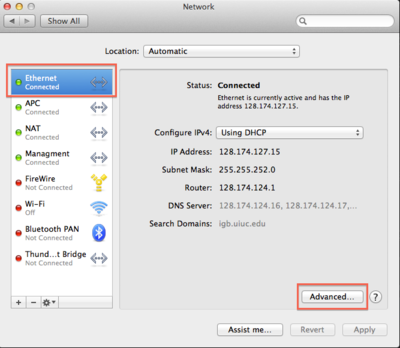
Make sure Ethernet is selected on the left side menu and click on "Advanced" | |||
[[File: | [[File:OSX 2.png|400px]] | ||
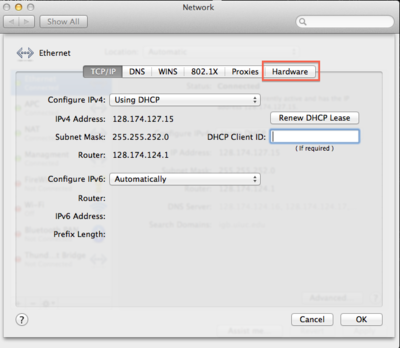
Click on the far right tab called "Hardware" | |||
[[File:OSX 3.png|400px]] | |||
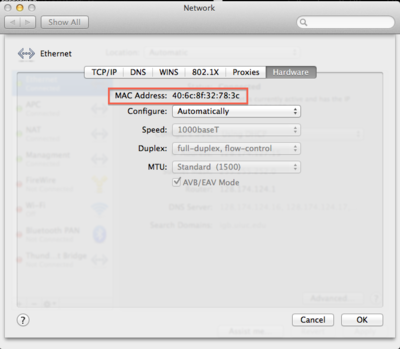
The hardware address is the "MAC Address" listed at the top of this screen | |||
[[File:OSX 4.png|400px]] | |||
=== Ubuntu Linux === | |||
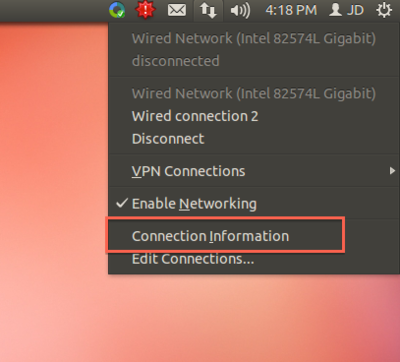
Click on the Network Connection Icon in the upper right corner and select "Connection Information" | |||
[[File:Linux 1.png]] | [[File:Linux 1.png|400px]] | ||
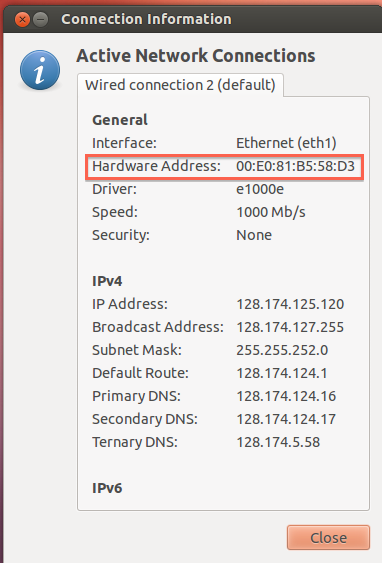
The hardware address is listed in the table in this window | |||
[[File:Linux 2.png]] | [[File:Linux 2.png|400px]] | ||
Latest revision as of 14:52, 19 March 2020
A hardware address, also known as a physical address or MAC address, is a sequence of twelve letters and numbers which are used to identify a computer on a network. We will ask you for your Hardware Address in order to get your computer connected to our wired network.
How to find your hardware address
Use the steps from the appropriate section below to find your computer's Mac Address. Make sure your network cable is plugged in while completing these steps. If your network cable is not plugged in, you may not be able to see the hardware address.
Windows 10
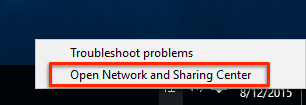
In the lower right corner of your screen, right click on the network icon and choose "Open Network and Sharing Center"
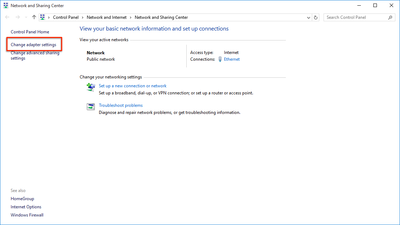
In the lefthand column, choose "Change Adapter Settings"
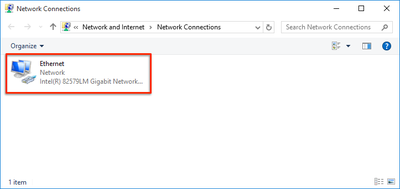
Double-click the "Ethernet" connection. If you see multiple connections on this screen, make sure not to select one labelled "Wi-Fi."
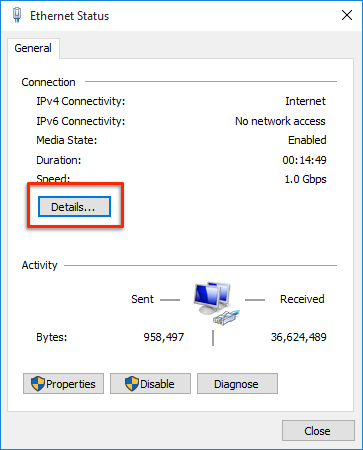
Click on "Details"
The hardware address is the "Physical Address" listed in the table in this window
Windows 7
At the bottom right corner of the screen click on Network > Open Network and Sharing Center
Click on "Change Adapter Settings"
Select "Local Area Connection"
Click on "Details"
The hardware address is the "Physical Address" listed in the table in this window
macOS
Open System Preferences and select Network
Make sure Ethernet is selected on the left side menu and click on "Advanced"
Click on the far right tab called "Hardware"
The hardware address is the "MAC Address" listed at the top of this screen
Ubuntu Linux
Click on the Network Connection Icon in the upper right corner and select "Connection Information"
The hardware address is listed in the table in this window
