Genemapper
Contents
About[edit]
GeneMapper® Software is a flexible genotyping software package that provides DNA sizing and quality allele calls for all Life Technologies® electrophoresis-based genotyping systems. Genemapper Website
The GeneMapper Remote Desktop is shared among all of the researchers who make use of our facility for fragment analysis applications. Before setting up your initial connection to the desktop, and each subsequent time you access it for data analysis, you must schedule a session on our Online Calendar at http://www-app.igb.illinois.edu/biotech_schedule/. Sessions are limited to 4 hours per customer per day.
Please follow the steps carefully and do not skip any of them. If you have questions or problems, please contact us at dna-seq@illinois.edu or 217-333-9520.
Access[edit]
- Please fill out the genemapper access form at http://www.biotech.illinois.edu/content/biotech-genemapper-access-form
- Once your account is activated you will be able to make reservations and login to Genemapper.
Reservations[edit]
To schedule a session, first go to the Online Calendar at http://www-app.igb.illinois.edu/biotech_schedule/. You’ll be granted access to the calendar when we confirm that you are a UIUC customer (I try to do this as soon as I receive the e-mail request). After you receive confirmation, you may log back on to calendar and reserve a time slot. To do so, select Go to the Online Scheduler under ‘My Quick Links’. Choose GeneMapper Remote in the ‘View schedule’ drop-down box. On the calendar, click on the time slot you want to reserve (all times are CST). In the ‘New Reservation’ window that appears, choose the starting and ending times of your session (please remember the time limit of 4 hours/day) and click Save to make your reservation. The scheduler will send you an e-mail confirming your reservation. Use the ‘My Reservations’ section on the control panel to view, edit or delete reservations.
Connecting[edit]
Genemapper Servers[edit]
- genemapper1.biotech.illinois.edu
- genemapper2.biotech.illinois.edu
Windows 7[edit]
OS X[edit]
- If you don't have Remote Desktop Connection for Mac, you can download it here: http://www.microsoft.com/en-us/download/details.aspx?id=18140
- When it is installed, go to RDC > Preferences. It should open a window with several tabs.
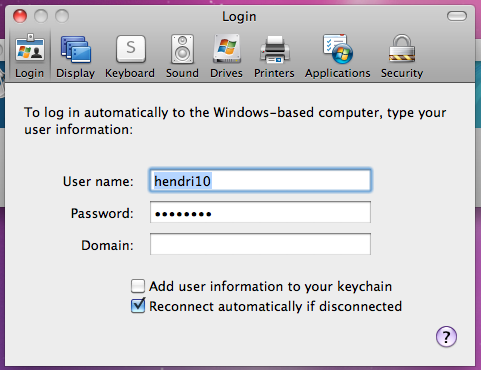
- On the Login tab:
- Enter your username ‘XXXXXXX’ in the User name field. Your username is your netid if you are on campus, or "cbc_[username]" if you are outside campus.
- Enter your password ‘XXXXXXX’ in the Password field.
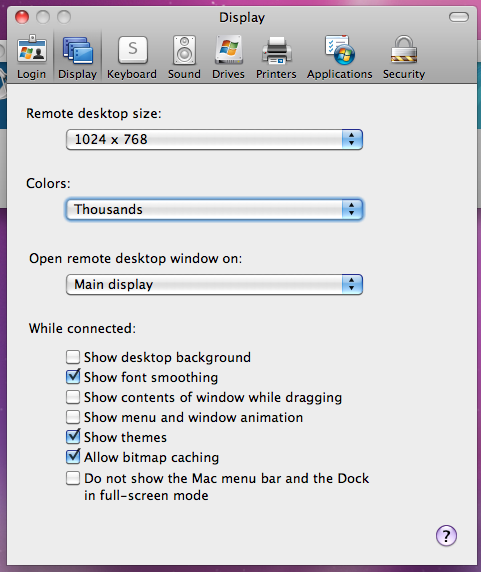
- On the Display tab:
- Choose ‘1024 x 768’ for the size of the display to obtain the best performance.
- Choose 'Thousands' for the colors. 'Millions' will slow down the connection to the remote computer.
Running Genemapper[edit]
- When you first open Genemapper, you will put in your username and the temporary password of "biotech". Then you can reset your genemapper password.
- Select a folder on your computer to be available for use on the Remote Desktop. We recommend that you create a unique folder for this purpose, so that other users on the Remote Desktop cannot access your personal files via the ‘My Computer’ or ‘Home’ folders. Use this folder to archive copies of your GeneMapper projects as you create them. We have unfortunately had instances in the past when the Remote became corrupted and all data was lost. Please do not use the Remote Desktop as an archive for your files!
- Click the Connect button. The GeneMapper window will open and you will see a Windows desktop. Launch the GeneMapper software and login using the same username and password that you used to set up the remote connection. Proceed with your analysis, and please remember to keep an eye on the time.
- At the end of your session, first exit out of the GeneMapper software and then disconnect from the remote server one of these two methods. Please note that if you simply close the remote window you will not be logged off and others will be prevented from accessing the computer.
- In the remote window, hit Control-Alt-Delete on your keyboard and choose the "Log Off" option in the window that appears (middle button on top row). Do not choose any of the other buttons because they will not log you off.
- In the remote window, go to START > Log Off. Do not use the "Disconnect" option because it will not log you off.

